Pushing Custom Images to Docker Hub Using GitHub Actions
Automate Docker image builds and deployments with GitHub Actions — CI/CD workflows to build, tag, and push container images to Docker Hub on every commit.
In the previous article I built a custom nginx image and pushed it to Docker Hub by hand: build, tag, login, push. That works exactly once. The second time you forget the tag, the third time a teammate pushes from a laptop with a stale base image, and soon nobody can say which commit produced the image running in production. The fix is boring and reliable: let GitHub Actions do the build and push on every commit to master.
1. Prerequisites
You need two things before starting:
-
An application that is already Dockerized. I am reusing the simple setup from the last article, two files:
index.htmland aDockerfile. The example project is here on GitHub. -
A Docker Hub account with your username and an access token.
2. Adding Secrets in GitHub
The workflow needs your Docker Hub credentials, and they belong in GitHub secrets, never in the workflow file itself. In your repository, go to Settings > Secrets > Actions and click New repository secret. Create two secrets:
-
DOCKERHUB_TOKEN— your Docker Hub access token. -
DOCKERHUB_USERNAME— your Docker Hub username.
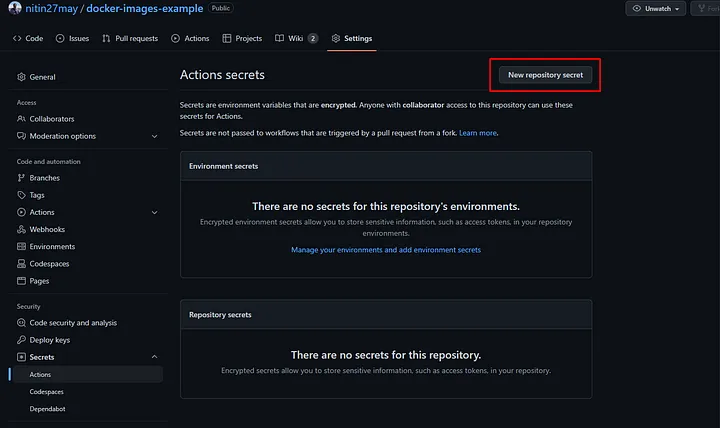

GitHub Action Adding New Secret
With the secrets in place, add the workflow file to the repository like below:

3. Setting Up the GitHub Actions Workflow
Create a new file at .github/workflows/docker-image.yml with the following contents:
name: Nginx Build
on:  push:    branches: master    paths:    - '**'jobs:  main:    runs-on: ubuntu-22.04    steps:      -        name: Checkout        uses: actions/checkout@v2      -        name: Set up QEMU        uses: docker/setup-qemu-action@v2      -        name: Set up Docker Buildx        uses: docker/setup-buildx-action@v2      -        name: Login to DockerHub        uses: docker/login-action@v2        with:          username: ${{ secrets.DOCKERHUB_USERNAME }}          password: ${{ secrets.DOCKERHUB_TOKEN }}      -        name: Build and push        id: docker_build        uses: docker/build-push-action@v3        with:          context: .          file: Dockerfile          push: true          tags:  ${{ secrets.DOCKERHUB_USERNAME }}/my-custom-nginx:latest, ${{ secrets.DOCKERHUB_USERNAME }}/my-custom-nginx:${{github.run_number}}          secrets: |            GIT_AUTH_TOKEN=${{ secrets.DOCKERHUB_TOKEN }}      -        name: Image digest        run: echo ${{ steps.docker_build.outputs.digest }}
This workflow runs each time code is pushed to the master branch:
-
Checkout: Pulls the latest code from the repository.
-
Set up QEMU: Installs QEMU for building images for different architectures.
-
Set up Docker Buildx: Enables advanced build options in Docker.
-
Log in to Docker Hub: Uses your stored credentials to log in.
-
Build and Push Image: Builds the image and tags it with both
latestand the GitHub run number, so each build gets its own version tag. -
Show Image Digest: Outputs the digest after a successful build.
4. Tagging the Docker Image
The workflow tags the image in two ways:
-
latest: This tag will always point to the most recent image. -
${{github.run_number}}: A unique tag based on the GitHub Actions run number, giving each build its own version.
5. Monitoring the Workflow
Once you push the workflow file to the master branch, GitHub Actions automatically triggers the build. You can view the status under the repository’s Actions tab. A yellow dot shows a build in progress, and tags are updated upon successful completion.
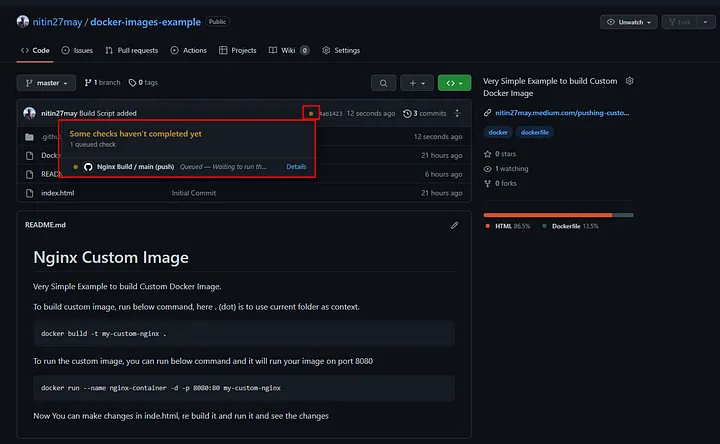
Github Repository Showing Building Status
The below screenshot shows how tags get updated in any build.
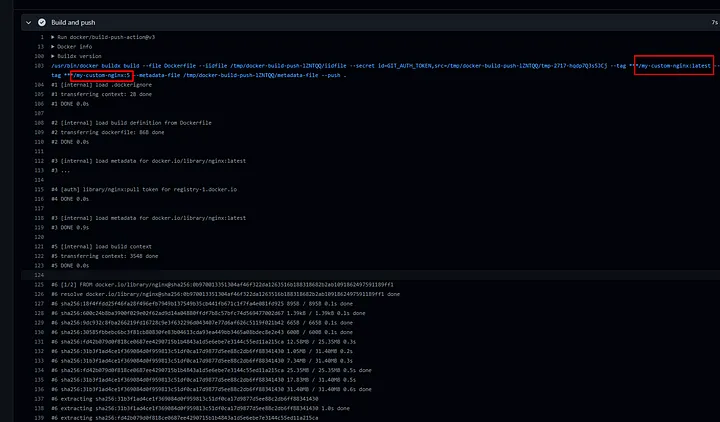
Github Action Build Running Status 2
Below is the screenshot from a successful run.
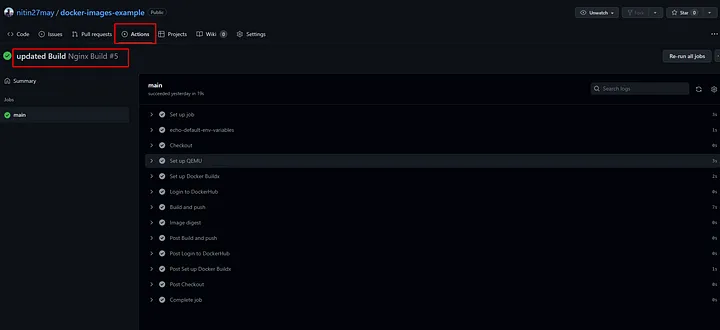
Github Action Build Running Status
6. Viewing the Results
After the successful push, Docker Hub shows two tags for the image: latest and 5. The 5 is the build number from GitHub Actions, which means I can pull that exact image back at any time or point a rollback at it.
Here’s a screenshot of the published image tags:
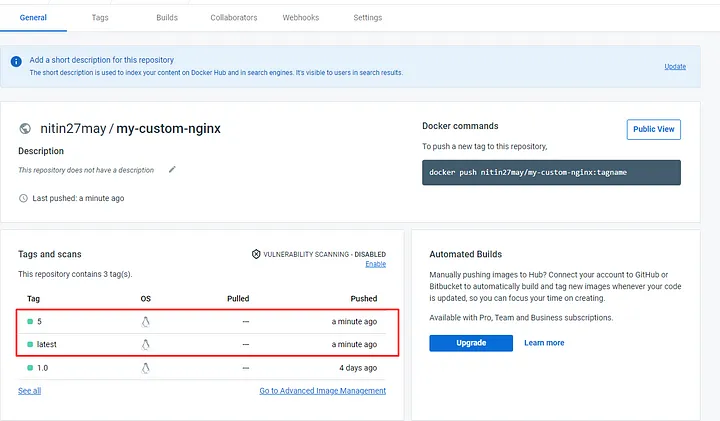
Docker Published Image Tags History
What’s next
Take the example repo, swap in your own Dockerfile, and push a commit; you should see both tags appear on Docker Hub within a couple of minutes. The same workflow shape works for other registries too. Point docker/login-action at ACR or ECR credentials and change the tag prefix, and you have the identical pipeline against a private registry.
Comments
Comments are GitHub discussions. Sign in with GitHub to post; reactions need no account.