Simplify Your Workflow: How to Build Custom Commands with the .NET CLI
Build custom .NET CLI tools that turn repetitive, multi-step tasks into a single command — packaging and sharing utilities for Microsoft Graph and HTTP.
Our support team used to open the Azure portal every time someone needed a user’s group memberships. Click through Azure AD, find the user, expand groups, copy the list, paste it into a ticket. A dozen times a day. It was slow, and it needed portal access we would rather not hand out widely.
So I wrapped the whole thing in a .NET CLI tool. Now it’s graph get-user --networkid USRNITIN --includegroup, and the answer prints in the terminal. That lookup is the use case this post is built around. Most .NET developers ship web apps and services, but the same SDK builds command-line tools that turn a repetitive, multi-step chore into one command the whole team runs the same way.
I’ll build two commands to show the pattern:
- A Microsoft Graph command that fetches a user’s details and group membership.
- A generic HTTP command that fires GET, POST, PUT, or DELETE at any URL, handy for quick API checks during development.
The two happen to hit Graph and raw HTTP, but the scaffolding underneath fits almost any repetitive API task.
Why Should You Build Custom .NET CLI Commands?
-
Automation: Why waste time running the same scripts or typing the same commands over and over? With a CLI tool, you can run a task with a single, simple command, saving hours over time.
-
Consistency: Custom commands ensure everyone on your team follows the same steps and settings, so there’s less chance for mistakes. They help standardize your processes and reduce errors across environments.
-
Easy to Use: CLI tools can include a built-in help system, so it’s easy to understand how to use them. Just type
--helpto see instructions and details about what each command can do. -
Organized Code: You can keep all your automated tasks in one place using .NET projects. This makes it easy to update, add features, and improve your tools over time without breaking old functionality.
-
Shareable: You can package and share your CLI tool so that anyone on your team can install it and start using it right away. This simplifies onboarding and ensures every team member has access to the same capabilities.
Custom CLI commands make your development environment more productive and your team’s workflow more efficient.
What Do You Need to Get Started?
Before you begin, make sure you have:
-
.NET SDK (version 6.0 or newer): You need the SDK to create, test, and run .NET applications.
-
Experience with C# programming: Basic coding knowledge is needed to write commands and integrate functionality.
-
Familiarity with .NET tools: Understanding tools like dependency injection and logging will help as you build more advanced features.
-
(Optional) Access to an Azure AD tenant: If you’re planning to use Microsoft Graph, you’ll need access to Azure services for authentication and API calls.
The rest of this post walks the build from setup to a tool you can install and run.
Step 1: Setting Up the Project
Start by creating a new .NET console application. This serves as the foundation of your CLI tool:
dotnet new console --name CustomUtilityAdd the necessary dependencies to your project:
dotnet add package Microsoft.Extensions.DependencyInjection### For interacting with Microsoft Graph APIdotnet add package Azure.Identity### For command-line parsing,dotnet add package System.CommandLine### For console output formatting, add:dotnet add package Spectre.ConsoleNote: If you’re not using Microsoft Graph or Azure services, you can skip the Azure.Identity package.
These libraries cover the basics: dependency injection, command parsing, and readable console output.
Step 2: Configuring the Application
Instead of hardcoding settings, like API keys or credentials, put them in a configuration file. Create a file called appsettings.json in the root of your project:
{ "AzureAd": { "ClientId": "your-client-id", "ClientSecret": "your-client-secret", "TenantId": "your-tenant-id" }}This file will store important configuration data, such as credentials or other environment-specific settings. To load this configuration into your application, use the following code in your Program.cs file:
var config = new ConfigurationBuilder() .SetBasePath(AppContext.BaseDirectory) .AddJsonFile("appsettings.json", optional: true, reloadOnChange: true) .AddEnvironmentVariables() .Build();This approach keeps sensitive information out of your source code and makes updates easier.
Step 3: Setting Up Dependency Injection
Dependency injection (DI) helps you organize your code by separating responsibilities into different classes, like services and handlers. This makes your code more modular and easier to test. Set up DI in your project like this:
var services = new ServiceCollection();services.AddSingleton<IConfiguration>(config);services.AddLogging(loggingBuilder =>{ loggingBuilder.AddConsole();});services.AddTransient<IGraphService, GraphService>();DI is a flexible and scalable way to manage the components of your application. Even if you’re not using Microsoft Graph, this setup works for any additional logic or services you want to add.
Step 4: Build the Commands
How the System.CommandLine Library Helps
The System.CommandLine library makes it easy to create CLI tools with advanced features. Here are some of its benefits:
-
Input Parsing: Simplifies handling of commands, options, and arguments.
-
Validation: Ensures user input is correct, preventing errors before processing begins.
-
Help System: Automatically generates helpful messages for users.
-
Error Messages: Provides clear suggestions if a command is used incorrectly.
Using this library, you can build user-friendly tools that are reliable and easy to maintain.
Key Classes and Methods:
-
Command: Represents a command in the CLI tool. You can add options, arguments, and descriptions to it.
-
Option<T>: Represents a named option that accepts a value of type
T. -
RootCommand: Serves as the entry point of your application.
-
SetHandler: Binds custom logic to a command.
For more details, visit the System.CommandLine documentation.
Create the Root Command
The RootCommand serves as the main entry point for your CLI. From here, you can add subcommands to handle specific tasks:
Define the root command for your CLI tool:
using System.CommandLine;
var rootCommand = new RootCommand("A CLI tool for common tasks and interactions.");
In this example, we’ll create two subcommands:
-
get-user: Fetch user details from Microsoft Graph. -
http-request: Send HTTP requests to any URL.
Subcommands
Example 1: Get User Details (get-user)
The get-user command retrieves user information based on parameters like email or network ID. Here’s how to set it up:
// get-user commandvar getUserCommand = new Command("get-user", "Fetch user details from Microsoft Graph");var networkIdOption = new Option<string?>("--networkid", "The network ID (onPremisesSamAccountName) of the user.");var emailOption = new Option<string?>("--email", "The email (UPN) of the user.");var nameOption = new Option<string?>("--name", "The full display name of the user.");
var includeGroupOption = new Option<bool>("--includegroup", "Include groups the user belongs to.");var groupNameFragmentOption = new Option<string?>("--groupfragment", "Filter groups by a specific name fragment.");var exportOption = new Option<string?>("--export", "Path to export user details and groups to a file.");
getUserCommand.AddOption(networkIdOption);getUserCommand.AddOption(emailOption);getUserCommand.AddOption(nameOption);getUserCommand.AddOption(includeGroupOption);getUserCommand.AddOption(groupNameFragmentOption);getUserCommand.AddOption(exportOption);
getUserCommand.SetHandler(async (string? networkId, string? email, string? name, bool includeGroups,    string? groupFragment, string? exportPath) =>{    int provided = 0;    if (!string.IsNullOrEmpty(networkId)) provided++;    if (!string.IsNullOrEmpty(email)) provided++;    if (!string.IsNullOrEmpty(name)) provided++;
    if (provided != 1)    {        Console.WriteLine("You must provide exactly one of --networkid, --email, or --name.");        return;    }
    if (!string.IsNullOrEmpty(networkId))    {        await handlers.HandleGetUserByNetworkIdAsync(networkId, includeGroups, groupFragment, exportPath);    }    else if (!string.IsNullOrEmpty(email))    {        await handlers.HandleGetUserByEmailAsync(email, includeGroups, groupFragment, exportPath);    }    else if (!string.IsNullOrEmpty(name))    {        await handlers.HandleGetUserByNameAsync(name, includeGroups, groupFragment, exportPath);    }}, networkIdOption, emailOption, nameOption, includeGroupOption, groupNameFragmentOption, exportOption);
rootCommand.AddCommand(getUserCommand);
Below are the actual graph api method implementation for different scenarios:
public async Task HandleGetUserByNetworkIdAsync(string networkId, bool includeGroups = false, string? groupFragment = null, string? exportPath = null){    _logger.LogInformation("HandleGetUserByNetworkIdAsync called with {NetworkId}, IncludeGroups: {IncludeGroups}, GroupFragment: {GroupFragment}", networkId, includeGroups, groupFragment);
    var user = await _graphService.GetUserBySamAccountNameAsync(networkId, includeGroups, groupFragment);    UserCardFormatter.PrintUserWithGroups(user.User, user.Manager, user.Groups, exportPath);}
public async Task HandleGetUserByEmailAsync(string email, bool includeGroups = false, string? groupFragment = null, string? exportPath = null){    _logger.LogInformation("HandleGetUserByEmailAsync called with {Email}, IncludeGroups: {IncludeGroups}, GroupFragment: {GroupFragment}", email, includeGroups, groupFragment);
    var user = await _graphService.GetUserByEmailAsync(email, includeGroups, groupFragment);    UserCardFormatter.PrintUserWithGroups(user.User, user.Manager, user.Groups, exportPath);}
public async Task HandleGetUserByNameAsync(string name, bool includeGroups = false, string? groupFragment = null, string? exportPath = null){    _logger.LogInformation("HandleGetUserByNameAsync called with {Name}, IncludeGroups: {IncludeGroups}, GroupFragment: {GroupFragment}", name, includeGroups, groupFragment);
    var user = await _graphService.GetUserByDisplayNameAsync(name, includeGroups, groupFragment);    UserCardFormatter.PrintUserWithGroups(user.User, user.Manager, user.Groups, exportPath);}
Example 2: HTTP Requests
The http-request command sends HTTP requests to a specified URL. It can handle different HTTP methods like GET or POST:
var httpRequestCommand = new Command("http-request", "Make a generic HTTP request.");
// Define optionsvar methodOption = new Option<string>("--method", "HTTP method (GET, POST, etc.)") { IsRequired = true };var urlOption = new Option<string>("--url", "The URL to send the request to.") { IsRequired = true };
// Add optionshttpRequestCommand.AddOption(methodOption);httpRequestCommand.AddOption(urlOption);
// Set the handlerhttpRequestCommand.SetHandler((string method, string url) =>{    // Add logic to send HTTP request here    Console.WriteLine($"Sending {method} request to {url}");}, methodOption, urlOption);
rootCommand.AddCommand(httpRequestCommand);
Implementation of the http method execution:
public async Task ExecuteHttpRequest(string method, string url, string[]? headers, string? body){    try    {        // Add headers if provided        if (headers != null)        {            foreach (var header in headers)            {                var parts = header.Split(':', 2);                if (parts.Length == 2)                {                    _httpClient.DefaultRequestHeaders.Add(parts[0].Trim(), parts[1].Trim());                }            }        }
        // Perform HTTP request        HttpResponseMessage response;        switch (method.ToUpper())        {            case "GET":                response = await _httpClient.GetAsync(url);                break;            case "POST":                response = await _httpClient.PostAsync(url, new StringContent(body ?? "", Encoding.UTF8, "application/json"));                break;            case "PUT":                response = await _httpClient.PutAsync(url, new StringContent(body ?? "", Encoding.UTF8, "application/json"));                break;            case "DELETE":                response = await _httpClient.DeleteAsync(url);                break;            default:                AnsiConsole.MarkupLine("[red]Unsupported HTTP method: {0}[/]", method);                return;        }
        // Read and display the response        var responseContent = await response.Content.ReadAsStringAsync();        DisplayResponse(response, responseContent);    }    catch (Exception ex)    {        AnsiConsole.MarkupLine("[red]Error occurred:[/] {0}", ex.Message);    }}
Step 5: Running the Tool
Run your application with:
### Run your application with:dotnet run -- get-user --email user@example.com### For HTTP requests:dotnet run -- http-request --method GET --url https://jsonplaceholder.typicode.com/posts/1Step 6: Packaging and Installing the Tool
The Command name (which will initiate the execution of this package, you can define it in .csproj file:

Once your coding is complete, you can package your CLI tool for distribution.
Build and Create the Package
### Build and Create the Packagedotnet pack -c Release -o ./nupkg### Install Globallydotnet tool install --global --add-source ./nupkg graph### Update Existing Installationdotnet tool update --global --add-source ./nupkg graph### Uninstalldotnet tool uninstall --global graphStep 7: Using the Commands
Examples
### Fetch user details:graph get-user --networkid USRNITIN --includegroup### Fetch user details with filtered group membership:graph get-user --networkid USRNITIN --includegroup true --groupfragment char### Export user details:graph get-user --networkid USRNITIN --includegroup true --groupfragment char --export ./### Search for a group by name:graph get-group search --name MANAG### List all members of a group:graph get-group members --group MANAGER### Export group members to a CSV:graph get-group members --group SEC_GG_Q_NAV_EDITOR --csv ./Make HTTP requests:
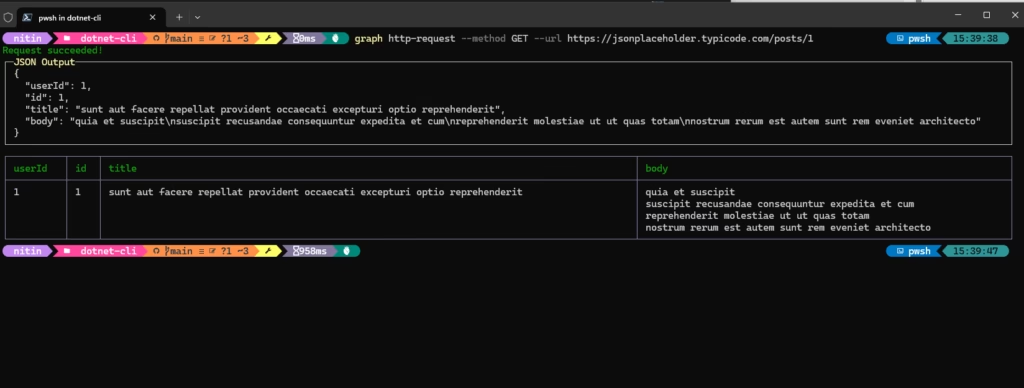
### GET request:graph http-request --method GET --url https://jsonplaceholder.typicode.com/posts/1### POST request:graph http-request --method POST --url https://jsonplaceholder.typicode.com/posts --body '{"title": "foo", "body": "bar", "userId": 1}'### GET request with headers:graph http-request --method GET --url https://api.example.com/resource --headers "Authorization:Bearer xyz" "Accept:application/json"Below is a sample output for the command graph http-request --method GET --url https://jsonplaceholder.typicode.com/posts/1
For First-Time CLI Developers
If this is your first time creating a command-line application, here are some additional tips:
-
Start Simple: Begin with a single command that solves one specific problem you face regularly.
-
Focus on User Experience: Clear help text, sensible defaults, and informative error messages make all the difference.
-
Test Thoroughly: Try your commands with different inputs, including edge cases and invalid data.
-
Get Feedback Early: Have colleagues try your tool and provide feedback on usability.
Our Real-World Use Case
At our organization, we built this CLI tool to solve specific problems:
-
Faster user lookups: Support teams needed a quick way to look up user information without navigating through the Azure portal.
-
Simplifying API Testing: Developers needed to test various API endpoints during development without writing custom code each time.
-
Automating Routine Tasks: Teams needed to export user group membership reports for compliance reviews.
Before implementing this CLI tool, these tasks required multiple steps through different interfaces or custom scripts. Now, team members can perform these operations with simple, consistent commands, saving significant time and reducing errors.
Internal team tooling or a utility for a wider audience, the pattern holds: give each command one job, and let the framework handle parsing and help.
Additional Features
Keep your CLI structured for easy maintenance.
-
Exporting Data
-
Implement CSV or JSON export by writing to a file.
-
Ideal for saving query results, logs, or system statuses.
-
-
Formatted Output with Spectre.Console
-
Use tables, panels, or colored output for easier reading.
-
Particularly helpful when displaying complex data in your CLI.
-
-
Authentication & Security
-
If interacting with protected APIs, integrate OAuth 2.0 or other protocols.
-
Store secrets securely, using environment variables or Azure Key Vault.
-
-
Extensible Architecture
- Create additional subcommands for tasks like data seeding, cleaning logs, or generating reports.
Formatted Output
Use Spectre.Console to create visually appealing CLI output, such as tables and panels.
Comments
Comments are GitHub discussions. Sign in with GitHub to post; reactions need no account.