Adding .NET Aspire to an Existing Clean Architecture Project
Add .NET Aspire to an existing Clean Architecture app — AppHost orchestration, service discovery, and OpenTelemetry — without a rewrite.
On more than one project I’ve watched the first sprint disappear into Docker Compose files and appsettings drift: standing up databases, wiring service discovery, getting distributed tracing working, keeping connection strings in sync across environments. None of it is business logic, and all of it has to work before the business logic can.
I already had a Clean Architecture app running (Angular frontend, .NET API, PostgreSQL) with its own Docker Compose setup. Rather than rewrite it, I put .NET Aspire on top and let the AppHost own orchestration. The whole migration came down to two new projects, one line in Program.cs, and a project reference. This post is what I changed, in order, and what each change bought me.
Adding Aspire to an Existing Project
You don’t need to start from scratch. This project shows how to add Aspire to an existing Clean Architecture application. Here’s what I added:
Project Structure Changes
aspire/ # NEW - Aspire orchestration├── AppHost/│ ├── AppHost.cs # Service definitions│ └── Contact.AppHost.csproj # AppHost project file└── ServiceDefaults/ ├── Extensions.cs # OpenTelemetry, health checks └── Contact.ServiceDefaults.csprojSteps to Add Aspire to Your Existing Project
-
Install the Aspire workload:
Terminal window dotnet workload install aspire -
Create the AppHost project:
Terminal window dotnet new aspire-apphost -n YourApp.AppHost -
Create the ServiceDefaults project:
Terminal window dotnet new aspire-servicedefaults -n YourApp.ServiceDefaults -
Reference ServiceDefaults in your API project:
<ProjectReference Include="..\ServiceDefaults\YourApp.ServiceDefaults.csproj" /> -
Add ServiceDefaults to your Program.cs:
var builder = WebApplication.CreateBuilder(args);builder.AddServiceDefaults(); // Add this line// ... your existing code ...var app = builder.Build();app.MapDefaultEndpoints(); // Add health check endpointsapp.Run(); -
Configure your AppHost to orchestrate services (see Deep Dive section below)
For detailed instructions, see Microsoft’s official guide: Add .NET Aspire to an existing .NET app
The Problem with Traditional Microservices Development
The same friction shows up on every project. Here’s where the time goes:
Common Challenges Include:
| Challenge | Impact |
|---|---|
| Service Discovery | Manually managing URLs and ports across environments |
| Connection Strings | Duplicating database configs in multiple places |
| Observability | Setting up separate tools for logs, traces, and metrics |
| Container Management | Writing complex docker-compose files |
| Health Monitoring | Implementing custom health check endpoints |
| Environment Variables | Managing different configs for dev/staging/prod |
What is .NET Aspire?
.NET Aspire is a stack for building observable, distributed applications. At its core is the AppHost: a code-first orchestrator that defines your application’s services, resources, and connections.
Key Capabilities
- AppHost Orchestration: Define services, dependencies, and configuration in code - no YAML required
- Rich Integrations: NuGet packages for popular services with standardized interfaces
- Built-in Observability: OpenTelemetry integration out of the box
- Developer Dashboard: Real-time visibility into all your services
- Consistent Tooling: Works with Visual Studio, VS Code, and CLI
Architecture Overview: This Project with Aspire
Here’s how this Clean Architecture project is orchestrated with .NET Aspire:
Service Flow Explained
sequenceDiagram    participant U as User    participant F as Angular Frontend    participant A as .NET API    participant D as PostgreSQL    participant T as Aspire Dashboard
    Note over U,T: All services automatically discovered via Aspire
    U->>F: 1. Navigate to app    F->>A: 2. API Request (service://contact-api)
    Note over F,A: Service Discovery - No hardcoded URLs!
    A->>D: 3. Query Database
    Note over A,D: Connection string injected by Aspire
    D-->>A: 4. Return Data    A-->>F: 5. JSON Response    F-->>U: 6. Render UI
    Note over A,T: OpenTelemetry sends traces/metrics
    A--)T: Trace Data    F--)T: Trace Data    D--)T: Health Status
Deep Dive: The AppHost Configuration
The heart of Aspire is the AppHost.cs file. Here’s our project’s configuration:
var builder = DistributedApplication.CreateBuilder(args);
// Database initialization scriptsvar scriptsPath = Path.Combine(builder.AppHostDirectory, "..", "..", "scripts");
// PostgreSQL with pgAdmin and data persistencevar postgres = builder.AddPostgres("postgres")    .WithDataVolume("postgres-data")    .WithPgAdmin()    .WithBindMount(scriptsPath, "/docker-entrypoint-initdb.d");
var contactsDb = postgres.AddDatabase("contactsdb", "contacts");
// Backend API - automatic database referencevar api = builder.AddProject<Projects.Contact_Api>("contact-api")    .WithReference(contactsDb)    .WaitFor(contactsDb)    .WithEnvironment(context =>    {        context.EnvironmentVariables["AppSettings__ConnectionStrings__DefaultConnection"] =            contactsDb.Resource.ConnectionStringExpression;    });
// Angular Frontend - automatic API referencevar frontend = builder.AddNpmApp("frontend", "../../frontend", "serve")    .WithReference(api)    .WaitFor(api)    .WithHttpEndpoint(targetPort: 4200, env: "PORT")    .WithExternalHttpEndpoints()    .PublishAsDockerFile();
builder.Build().Run();
What This Code Achieves
That handful of lines replaces a pile of manual wiring:
| Feature | Traditional Approach | With Aspire |
|---|---|---|
| Database Connection | Manual connection string in appsettings.json | WithReference(contactsDb) - automatic injection |
| Service URLs | Hardcoded http://localhost:5217 | service://contact-api - automatic discovery |
| Container Startup | Manual docker-compose up | WaitFor() - automatic dependency ordering |
| Health Checks | Custom implementation | Built-in with /health and /alive endpoints |
Service Discovery: How It Works
One of Aspire’s most useful features is automatic service discovery. No more hardcoded URLs.
How Service Discovery Works
When you call WithReference(api) in the AppHost, Aspire:
- Registers the service in its internal service registry
- Generates environment variables with service endpoints
- Configures HttpClient to resolve service names automatically
- Handles port changes transparently
// In your Angular proxy or API calls, instead of:// "http://localhost:5217/api/contacts"
// You use:// "service://contact-api/api/contacts"
// Aspire resolves this at runtime!
OpenTelemetry: Built-in Observability
Aspire ships OpenTelemetry support ready to go through the ServiceDefaults project:
public static TBuilder ConfigureOpenTelemetry<TBuilder>(this TBuilder builder)    where TBuilder : IHostApplicationBuilder{    // Structured Logging    builder.Logging.AddOpenTelemetry(logging =>    {        logging.IncludeFormattedMessage = true;        logging.IncludeScopes = true;    });
    // Metrics and Tracing    builder.Services.AddOpenTelemetry()        .WithMetrics(metrics =>        {            metrics.AddAspNetCoreInstrumentation()                .AddHttpClientInstrumentation()                .AddRuntimeInstrumentation();        })        .WithTracing(tracing =>        {            tracing.AddSource(builder.Environment.ApplicationName)                .AddAspNetCoreInstrumentation()                .AddHttpClientInstrumentation();        });
    return builder;}
That one ConfigureOpenTelemetry call gives you structured logs, distributed traces, and runtime metrics across every service, with no per-service setup.
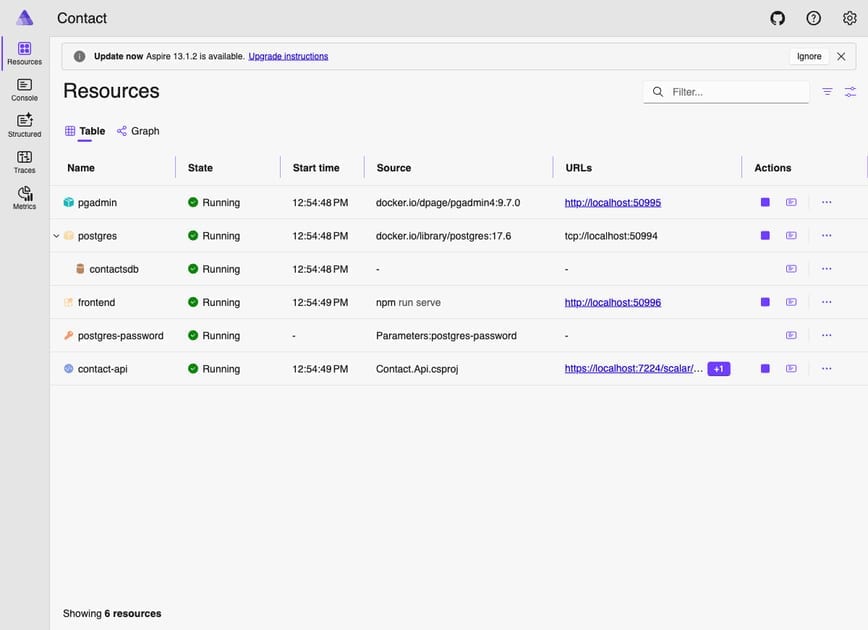
The Aspire Dashboard
When you run your Aspire application, the dashboard launches automatically. It gives you a resources view (service status, endpoints, environment variables, start/stop controls), live console logs filtered by service, a traces view with cross-service waterfalls, and a metrics view.
Dashboard Access
After running dotnet run --project aspire/AppHost, the dashboard is available at:
| Environment | URL |
|---|---|
| Local Development | https://localhost:17178 |
Why Use Aspire for Microservices
The gain lands in three places: developer experience (single-command startup, hot reload, easier debugging), operations (built-in monitoring, health checks, dependency ordering), and portability (the same topology runs locally and in the cloud).
Comparison: Before and After Aspire
| Aspect | Without Aspire | With Aspire |
|---|---|---|
| Setup Time | Hours/Days | Minutes |
| Configuration Files | Multiple (docker-compose, .env, etc.) | Single AppHost.cs |
| Service Discovery | Manual DNS/Environment vars | Automatic |
| Observability | Separate tool integration | Built-in |
| Health Checks | Custom implementation | Automatic |
| Local Development | Complex multi-terminal setup | Single F5/dotnet run |
| Debugging | Difficult across services | Native IDE support |
Getting Started with .NET Aspire
Prerequisites
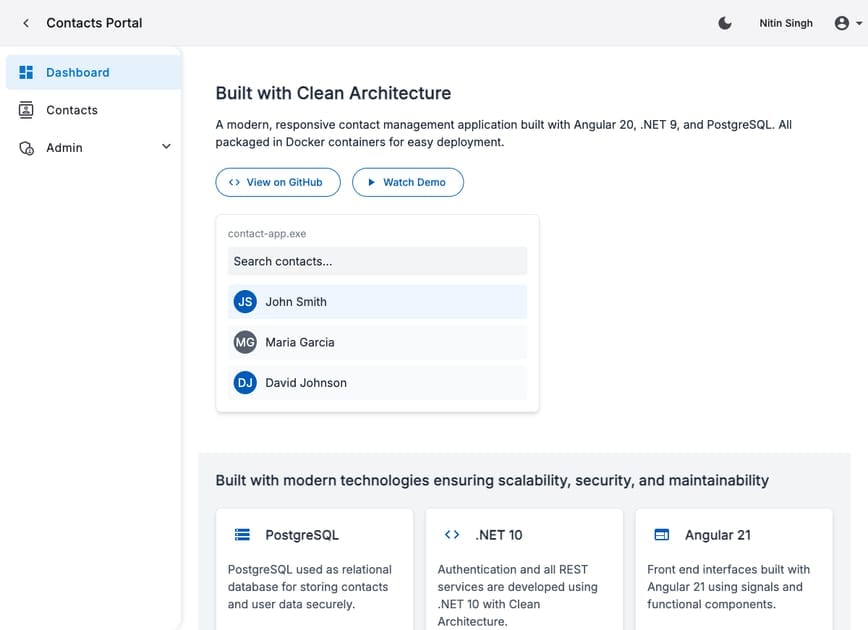
npm run serve, discovered automatically by the .NET API through Aspire service references. Seeded contacts load from PostgreSQL on first run.Quick Start Commands
# Clone the repositorygit clone https://github.com/nitin27may/clean-architecture-docker-dotnet-angular.gitcd clean-architecture-docker-dotnet-angular
# Install frontend dependenciescd frontend && npm install && cd ..
# Run with Aspiredotnet run --project aspire/AppHost
Creating a New Aspire Project from Scratch
# Install Aspire workloaddotnet workload install aspire
# Create new Aspire starter appdotnet new aspire-starter -n MyAspireApp
# Navigate and runcd MyAspireAppdotnet run --project MyAspireApp.AppHost
Using the Aspire CLI
The Aspire CLI provides additional capabilities:
# Install Aspire CLIdotnet tool install -g aspire.cli
# Create new projectaspire new starter --name MyApp
# Run projectaspire run
# Add integrationsaspire add postgresaspire add redisaspire add rabbitmq
Aspire Integrations Ecosystem
Aspire ships ready-to-use integrations for the usual suspects: PostgreSQL, SQL Server, MySQL, MongoDB, and Cosmos DB for data; Redis, Garnet, and Valkey for caching; RabbitMQ, Kafka, Azure Service Bus, and NATS for messaging; Azure Storage and AWS S3 for blobs. Each is a NuGet package with a standard registration.
Adding Integrations
// PostgreSQL with pgAdminvar postgres = builder.AddPostgres("postgres")    .WithPgAdmin()    .WithDataVolume();
// Redis for cachingvar redis = builder.AddRedis("cache");
// RabbitMQ for messagingvar rabbitmq = builder.AddRabbitMQ("messaging");
// Reference in your APIbuilder.AddProject<Projects.MyApi>("api")    .WithReference(postgres)    .WithReference(redis)    .WithReference(rabbitmq);
From Development to Production
The same AppHost.cs topology that runs locally maps to production targets: aspire deploy can push it to Azure Container Apps, Kubernetes, AWS ECS, or Docker Compose, keeping the same service graph with production-sized resources.
Deployment Example
| Component | Local (Aspire) | Azure | AWS |
|---|---|---|---|
| Frontend | npm serve | Azure Container Apps | ECS |
| API | dotnet run | Azure Container Apps | Lambda |
| Database | Docker container | Azure PostgreSQL | RDS |
Best Practices
1. Project Structure
├── aspire/│ ├── AppHost/ # Orchestration│ │ └── AppHost.cs # Service definitions│ └── ServiceDefaults/ # Shared configurations│ └── Extensions.cs # OpenTelemetry, health checks├── backend/│ └── Contact.Api/ # Your API project├── frontend/│ └── src/ # Angular application└── scripts/ └── seed-data.sql # Database initialization2. Always Use ServiceDefaults
// In your API's Program.csvar builder = WebApplication.CreateBuilder(args);builder.AddServiceDefaults();  // Add this line!
var app = builder.Build();app.MapDefaultEndpoints();     // Health check endpointsapp.Run();
3. Use WaitFor for Dependencies
var api = builder.AddProject<Projects.Api>("api") .WithReference(database) .WaitFor(database) // Ensures DB is ready .WithReference(cache) .WaitFor(cache); // Ensures cache is readyTroubleshooting Common Issues
| Issue | Solution |
|---|---|
| Port already in use | Stop other services or change port in AppHost |
| Docker not running | Start Docker Desktop first |
| Node modules missing | Run npm install in frontend folder |
| Database not initializing | Check scripts folder path in WithBindMount |
| Services not discovering | Check that WithReference is configured |
Try it on your own stack
If you’re running .NET plus Angular plus PostgreSQL, clone the repo1 and run dotnet run --project aspire/AppHost. You get the frontend, API, database, and pgAdmin under one command, with service discovery and OpenTelemetry already wired. It’s a low-risk change: the application code doesn’t move, and you can back it out by deleting two projects. Give the dashboard’s trace view ten minutes and you’ll see why it stays.
Resources
Official Documentation
- .NET Aspire Overview
- Build Your First Aspire App
- Add Aspire to Existing App(Add .NET Aspire to an existing .NET app)
- Aspire Dashboard Documentation5
This Project
- GitHub Repository1
Community
Next Steps
Related articles:
- Clean Architecture: Introduction to the Project Structure
- Dockerizing the .NET Core API, Angular and MS SQL Server
- Building Production-Ready Microservices with .NET Aspire
Comments
Comments are GitHub discussions. Sign in with GitHub to post; reactions need no account.