Building Production-Ready Microservices with .NET Aspire: A Complete E-Commerce Demo
Build a five-service .NET Aspire e-commerce demo: service discovery, connection strings, and OpenTelemetry with PostgreSQL, Redis, and RabbitMQ.
The last time I stood up a microservices project from scratch, the first two days went to infrastructure instead of features: a local PostgreSQL container, a Redis config, a RabbitMQ instance that refused to connect, connection strings copied across five appsettings.json files, and distributed tracing I kept meaning to wire up and never did.
.NET Aspire collapses that setup into one C# file. I rebuilt the whole thing as an e-commerce demo to prove it: five microservices, PostgreSQL, Redis, RabbitMQ, service discovery, and OpenTelemetry, all declared in a single AppHost and started with one dotnet run. Microsoft frames it as “a code-first, single source of truth that defines your app’s services, resources, and connections,” and for the inner development loop that framing actually holds up.
This post walks the real code: how the AppHost wires everything together, how service discovery resolves without Consul, and where the built-in tracing earns its place.
What is .NET Aspire?
Here’s what .NET Aspire actually is:
.NET Aspire is an opinionated, cloud-ready stack for building observable, production-ready, distributed applications. It provides:
- AppHost Orchestration: Define services, dependencies, and configuration entirely in C# code
- Rich Integrations: NuGet packages for popular services (databases, caches, message brokers) with standardized interfaces
- Built-in Observability: OpenTelemetry-based logging, tracing, and metrics out of the box
- Service Discovery: Automatic service discovery without external tools like Consul or Eureka
- Developer Dashboard: Real-time monitoring, logs, and traces
- Consistent Tooling: Project templates for Visual Studio, VS Code, and CLI
The key insight is that Aspire targets the inner development loop. It makes distributed apps genuinely quick to develop, debug, and test locally. It isn’t meant to replace Kubernetes in production; it removes the low-level setup that slows you down while developing.
Polyglot Support: Works With Any Language
Aspire’s polyglot support is easy to miss. While Aspire itself is built on .NET, it can orchestrate applications written in any language:
| Language/Runtime | How to Add | Example |
|---|---|---|
| Node.js | builder.AddNpmApp() | React, Angular, Express.js apps |
| Python | builder.AddPythonApp() | Flask, FastAPI, Django services |
| Go | builder.AddExecutable() | Any Go binary |
| Java | builder.AddExecutable() | Spring Boot applications |
| Any Container | builder.AddContainer() | Any Docker image |
Example: Adding a Node.js Frontend
var frontend = builder.AddNpmApp("frontend", "../frontend") .WithReference(apiService) .WithHttpEndpoint(port: 3000, env: "PORT") .WithExternalHttpEndpoints();Example: Adding a Python Service
var pythonApi = builder.AddPythonApp("analytics", "../analytics-service", "main.py") .WithReference(postgres) .WithHttpEndpoint(port: 8000);This means you can use Aspire as the orchestration layer for your entire microservices ecosystem, regardless of what languages your team uses. The service discovery, observability, and infrastructure management benefits apply to all services in your AppHost.
The Problem with Traditional Microservices Development
You know the drill. You’re starting a new project with a few APIs, a database, Redis for caching, and RabbitMQ for async communication. Here’s what your first few days look like:
Day 1: Infrastructure Setup
# Install PostgreSQL locally... or use Docker?docker pull postgres:15docker run -d --name postgres -e POSTGRES_PASSWORD=secret -p 5432:5432 postgres:15
# Wait, I also need Redisdocker pull redis:7docker run -d --name redis -p 6379:6379 redis:7
# And RabbitMQ with the management plugindocker pull rabbitmq:3-managementdocker run -d --name rabbitmq -p 5672:5672 -p 15672:15672 rabbitmq:3-management
Day 2: Connection String Hell
// appsettings.json - Service A{  "ConnectionStrings": {    "Database": "Host=localhost;Port=5432;Database=serviceA;Username=postgres;Password=secret"  }}
// appsettings.json - Service B (copy-paste, change database name)// appsettings.json - Service C (copy-paste again...)// appsettings.Development.json - different values// Environment variables in production - completely different
Day 3: Service Discovery Nightmare
// How does Service A find Service B?// Option 1: Hardcode URLs (bad)var client = new HttpClient { BaseAddress = new Uri("http://localhost:5001") };
// Option 2: Configuration (better, but still manual)var serviceUrl = configuration["Services:ServiceB:Url"];
// Option 3: Service registry (complex setup required)// Install Consul, configure agents, write health checks...
Day 4: Observability Gap
// Distributed tracing? That requires:// - OpenTelemetry SDK in each service// - Jaeger or Zipkin deployment// - Correlation ID propagation// - Custom instrumentation// - Hours of configurationThis keeps happening in every microservices project. The infrastructure work eats into actual development time.
The Real Challenges
| Challenge | Impact |
|---|---|
| Infrastructure Setup | Hours spent installing and configuring databases, caches, message brokers |
| Connection String Management | Hardcoded values, secrets in source control, environment drift |
| Service Discovery | Complex setup with Consul/Eureka or brittle hardcoded URLs |
| Observability | Distributed tracing requires significant investment |
| Local Development | “It works on my machine” syndrome, inconsistent environments |
| Startup Orchestration | Services crash because dependencies aren’t ready |
| Container Management | Docker Compose files grow complex, port conflicts, volume management |
.NET Aspire addresses all of these.
Getting Started with .NET Aspire
Here’s how to get started with .NET Aspire from scratch before we look at the full e-commerce demo.
Prerequisites
To work with .NET Aspire, you need:
| Requirement | Details |
|---|---|
| .NET SDK | .NET 8.0 or .NET 9.0 |
| Container Runtime | Docker Desktop or Podman |
| IDE (Optional) | Visual Studio 2022 (v17.9+), VS Code with C# Dev Kit, or JetBrains Rider |
Installing Aspire Templates
Open your terminal and run:
# Install the Aspire project templatesdotnet new install Aspire.ProjectTemplates
# To install a specific versiondotnet new install Aspire.ProjectTemplates::9.4.0
Creating Your First Aspire Project
# Create a new Aspire Starter Applicationdotnet new aspire-starter -n MyFirstAspireApp
# Navigate to the AppHost projectcd MyFirstAspireApp/MyFirstAspireApp.AppHost
# Run the applicationdotnet run
Aspire will:
- Start your services
- Launch the Aspire Dashboard
- Display the dashboard URL in the console (typically
https://localhost:17198)
Available Templates
After installing Aspire templates, you have access to:
| Template | Description | Command |
|---|---|---|
| Aspire Starter | Full starter with AppHost + ServiceDefaults + API + Web | dotnet new aspire-starter |
| Aspire Empty | Minimal AppHost + ServiceDefaults | dotnet new aspire |
| Aspire AppHost | Add AppHost to existing solution | dotnet new aspire-apphost |
| Aspire Service Defaults | Add ServiceDefaults project | dotnet new aspire-servicedefaults |
| Aspire Test Project | Integration test project | dotnet new aspire-test |
Official Resources
E-Commerce Demo: Architecture Overview
The e-commerce application I built to demonstrate Aspire’s capabilities is not a toy example. It’s a production-quality implementation with five microservices, event-driven communication, caching, and proper authentication.
Technology Stack
| Component | Technology | Why This Choice |
|---|---|---|
| Orchestration | .NET Aspire AppHost | Single source of truth for all services |
| Frontend | Blazor Server + Bootstrap 5.3 | Rich interactive UI with C# |
| APIs | ASP.NET Core Minimal APIs | Lightweight, fast, modern patterns |
| Database | PostgreSQL (5 separate databases) | Database-per-service pattern |
| Caching | Redis | High-performance distributed cache |
| Messaging | RabbitMQ | Reliable async communication |
| Authentication | JWT + ASP.NET Core Identity | Industry-standard security |
| ORM | Entity Framework Core | Productivity with LINQ |
| API Docs | Scalar (OpenAPI) | Modern alternative to Swagger UI |
| Observability | OpenTelemetry (built-in) | Traces, metrics, logs, automatic |
Microservices Breakdown
| Service | Responsibility | Dependencies |
|---|---|---|
| Product Catalog API | Products, categories, search, filtering | PostgreSQL, Redis |
| User Management API | Registration, authentication, profiles | PostgreSQL |
| Orders API | Order creation, history, status | PostgreSQL, RabbitMQ |
| Inventory API | Stock management, reservations | PostgreSQL, Redis, RabbitMQ |
| Notifications API | Email confirmations, alerts | PostgreSQL, RabbitMQ |
| Web Frontend | Customer UI | All APIs |
The AppHost: Your Single Source of Truth
The heart of .NET Aspire is the AppHost project. Your entire distributed application topology is defined in clean, readable C# code. No YAML, no JSON configuration files, no Docker Compose.
Here’s our complete e-commerce orchestration:
using Microsoft.Extensions.Hosting;
var builder = DistributedApplication.CreateBuilder(args);
// ============================================// INFRASTRUCTURE LAYER// ============================================
// PostgreSQL with PgAdmin for database managementvar postgres = builder.AddPostgres("postgres")    .WithPgAdmin();  // Adds web-based admin UI automatically!
// Create isolated databases for each servicevar catalogDb = postgres.AddDatabase("catalogdb");var usersDb = postgres.AddDatabase("usersdb");var ordersDb = postgres.AddDatabase("ordersdb");var inventoryDb = postgres.AddDatabase("inventorydb");var notificationsDb = postgres.AddDatabase("notificationsdb");
// Redis with Commander for cache inspectionvar redis = builder.AddRedis("redis")    .WithRedisCommander();  // Visual tool to inspect cache
// RabbitMQ with Management Pluginvar rabbitMq = builder.AddRabbitMQ("rabbitmq")    .WithManagementPlugin();  // Web UI at port 15672
// ============================================// MICROSERVICES LAYER// ============================================
// Product Catalog - needs database and cachevar productCatalogApi = builder.AddProject<Projects.ECommerce_ProductCatalog_Api>("productcatalogapi")    .WithReference(catalogDb)    .WithReference(redis)    .WaitFor(catalogDb)    .WaitFor(redis);
// User Management - needs database onlyvar userManagementApi = builder.AddProject<Projects.ECommerce_UserManagement_Api>("usermanagementapi")    .WithReference(usersDb)    .WaitFor(usersDb);
// Inventory - needs database, cache, and message queuevar inventoryApi = builder.AddProject<Projects.ECommerce_Inventory_Api>("inventoryapi")    .WithReference(inventoryDb)    .WithReference(redis)    .WithReference(rabbitMq)    .WaitFor(inventoryDb)    .WaitFor(redis)    .WaitFor(rabbitMq);
// Orders - needs database, message queue, and other servicesvar ordersApi = builder.AddProject<Projects.ECommerce_Orders_Api>("ordersapi")    .WithReference(ordersDb)    .WithReference(rabbitMq)    .WithReference(inventoryApi)      // Service-to-service reference!    .WithReference(userManagementApi)    .WithReference(productCatalogApi)    .WaitFor(ordersDb)    .WaitFor(rabbitMq);
// Notifications - consumes events from message queuevar notificationsApi = builder.AddProject<Projects.ECommerce_Notifications_Api>("notificationsapi")    .WithReference(notificationsDb)    .WithReference(rabbitMq)    .WithReference(userManagementApi)    .WaitFor(notificationsDb)    .WaitFor(rabbitMq);
// ============================================// PRESENTATION LAYER// ============================================
// Blazor Web Frontendbuilder.AddProject<Projects.ECommerce_Web>("webfrontend")    .WithExternalHttpEndpoints()  // Expose to browser    .WithReference(productCatalogApi)    .WithReference(userManagementApi)    .WithReference(ordersApi)    .WithReference(inventoryApi)    .WaitFor(productCatalogApi)    .WaitFor(userManagementApi)    .WaitFor(ordersApi)    .WaitFor(inventoryApi);
builder.Build().Run();
Understanding the Key Concepts
Here’s what’s happening in this code:
1. Infrastructure Declaration
var postgres = builder.AddPostgres("postgres") .WithPgAdmin();This single line:
- Pulls the PostgreSQL container image
- Starts a PostgreSQL server
- Configures networking automatically
- Adds PgAdmin web interface for database management
- Generates secure passwords
- All without you writing a single Docker command
2. Database-Per-Service Pattern
var catalogDb = postgres.AddDatabase("catalogdb");var usersDb = postgres.AddDatabase("usersdb");Each service gets its own database, ensuring data isolation. Aspire creates all five databases in the same PostgreSQL instance automatically.
3. Dependency Declaration with WithReference()
var productCatalogApi = builder.AddProject<Projects.ECommerce_ProductCatalog_Api>("productcatalogapi") .WithReference(catalogDb) .WithReference(redis);WithReference() does multiple things:
- Injects connection strings as environment variables
- Configures service discovery endpoints
- Establishes a dependency graph for startup ordering
4. Startup Orchestration with WaitFor()
.WaitFor(catalogDb).WaitFor(redis);Unlike Docker Compose’s depends_on, which only waits for container start, WaitFor() uses health checks to confirm the dependency is actually ready to accept connections. That’s the end of “connection refused” errors on startup.
5. Management UIs Included
.WithPgAdmin() // Database management.WithRedisCommander() // Cache inspection.WithManagementPlugin() // RabbitMQ dashboardThese method calls add production-quality management tools automatically. No separate installation, no configuration.
What Aspire Does Behind the Scenes
When you run dotnet run in the AppHost project, Aspire:
- Pulls container images for PostgreSQL, Redis, RabbitMQ
- Creates containers with proper networking configuration
- Generates connection strings with secure passwords
- Injects environment variables into each service
- Waits for health checks to pass before starting dependent services
- Starts the Aspire Dashboard for monitoring
- Configures OpenTelemetry exporters for all services
Service Discovery: How It Works
Service discovery is where most microservices setups get messy. How does the Orders API know where to find the Inventory API? The answers range from bad to complex:
Traditional Approaches (Before Aspire)
Option 1: Hardcoded URLs (Don’t do this)
var client = new HttpClient { BaseAddress = new Uri("http://localhost:5001") };// Breaks in different environments, can't scaleOption 2: Configuration-based (Better, but tedious)
{ "Services": { "InventoryApi": "http://localhost:5001" } }
// Program.csvar url = configuration["Services:InventoryApi"];// Manual configuration for every environment
Option 3: Service Registry (Complex)
// Requires Consul/Eureka setup, health check configuration,// service registration code, DNS or client-side discovery...// Significant infrastructure overheadThe Aspire Way
With .NET Aspire, service discovery is automatic. Here’s how our Orders API calls the Inventory API:
// In Program.cs - Register HttpClient with service namebuilder.Services.AddHttpClient("inventoryapi", client =>{    client.BaseAddress = new Uri("https+http://inventoryapi");});
// The "inventoryapi" name matches the AppHost registration
The URL https+http://inventoryapi gets resolved by Aspire’s service discovery. No hardcoded URLs, no environment variables to manage, no service registry to set up.
How It Works Under the Hood
The service discovery flow:
- AppHost registers services with logical names like
inventoryapi - Environment variables are injected with actual endpoints for each protocol
- Service Discovery middleware intercepts the
https+http://scheme - Resolution happens automatically - HTTPS is preferred, HTTP is fallback
- Built-in resilience handles transient failures with retries and circuit breakers
Key Features of Aspire Service Discovery
- Automatic Endpoint Resolution: Service names resolve to actual URLs
- HTTPS/HTTP Fallback: The
https+http://scheme tries HTTPS first, falls back to HTTP - Built-in Resilience: Configurable retry policies, circuit breakers
- Zero Configuration: Works out of the box with
WithReference() - Environment Agnostic: Same code works locally and in production
OpenTelemetry: Observability Out of the Box
Proper observability in distributed systems has a steep setup cost. Getting distributed tracing working traditionally requires:
- Installing OpenTelemetry SDKs in each service
- Configuring exporters for traces, metrics, and logs
- Setting up collectors (Jaeger, Zipkin, Prometheus)
- Implementing correlation ID propagation
- Deploying and maintaining observability infrastructure
With .NET Aspire, all of this is a single line of code:
builder.AddServiceDefaults();What AddServiceDefaults() Provides
This single method call configures:
| Feature | Description |
|---|---|
| OpenTelemetry Tracing | Automatic trace propagation across services |
| OpenTelemetry Metrics | CPU, memory, request latency, error rates |
| Structured Logging | Correlated logs with trace context |
| Health Checks | /health and /alive endpoints |
| Service Discovery | HttpClient configured for service resolution |
| Resilience | Standard resilience handlers for HTTP calls |
Inside the ServiceDefaults Extension
Here’s what our Extensions.cs in the ServiceDefaults project looks like:
public static class Extensions{    public static IHostApplicationBuilder AddServiceDefaults(this IHostApplicationBuilder builder)    {        // Configure OpenTelemetry for tracing and metrics        builder.ConfigureOpenTelemetry();
        // Add health check endpoints        builder.AddDefaultHealthChecks();
        // Enable service discovery        builder.Services.AddServiceDiscovery();
        // Configure HttpClient with resilience and service discovery        builder.Services.ConfigureHttpClientDefaults(http =>        {            http.AddStandardResilienceHandler();  // Retries, circuit breaker            http.AddServiceDiscovery();            // Resolve service names        });
        return builder;    }
    public static IHostApplicationBuilder ConfigureOpenTelemetry(this IHostApplicationBuilder builder)    {        builder.Logging.AddOpenTelemetry(logging =>        {            logging.IncludeFormattedMessage = true;            logging.IncludeScopes = true;        });
        builder.Services.AddOpenTelemetry()            .WithMetrics(metrics =>            {                metrics.AddAspNetCoreInstrumentation()                    .AddHttpClientInstrumentation()                    .AddRuntimeInstrumentation();            })            .WithTracing(tracing =>            {                tracing.AddSource(builder.Environment.ApplicationName)                    .AddAspNetCoreInstrumentation()                    .AddHttpClientInstrumentation();            });
        builder.AddOpenTelemetryExporters();
        return builder;    }}
The Aspire Dashboard: Your Observability Hub
When you run the AppHost, the dashboard at https://localhost:17198 shows:
- All running services and their status
- Real-time logs from all services
- Distributed traces for debugging
- Metrics and performance data
You don’t need to set up Grafana, Prometheus, or an ELK stack separately.
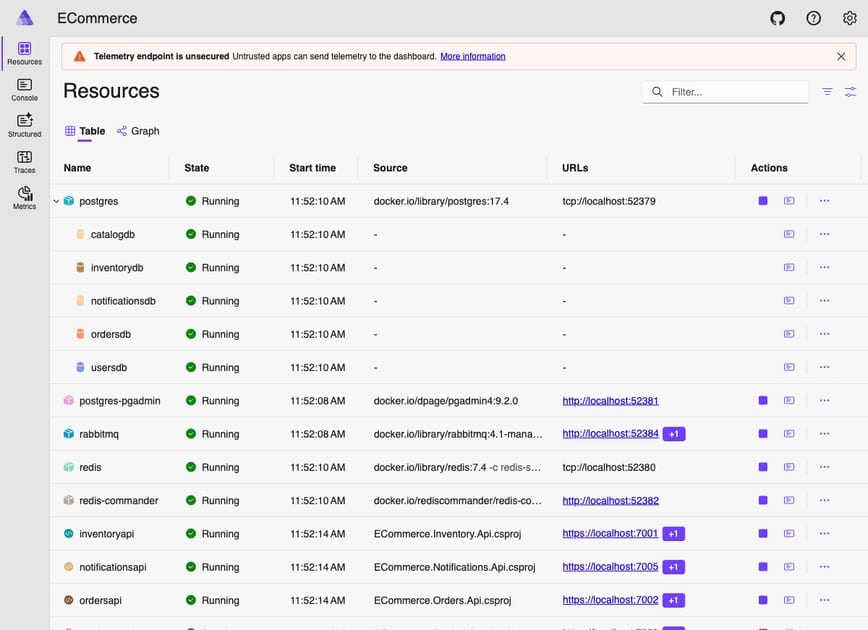
Dashboard Features
| Tab | What You See |
|---|---|
| Resources | All services, containers, their status, endpoints, and logs |
| Console Logs | Aggregated logs from all services with filtering |
| Structured Logs | Searchable structured log entries |
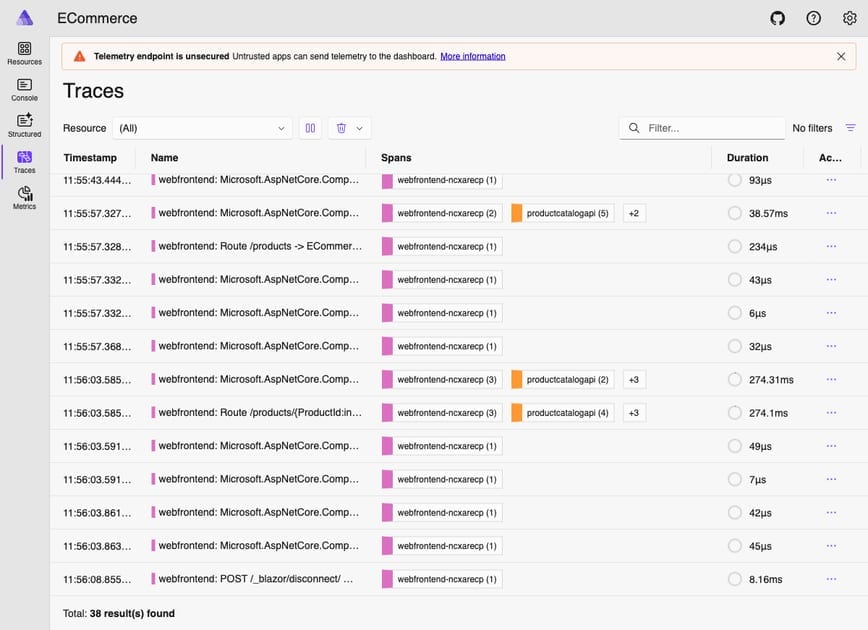
| Traces | Distributed traces showing request flow across services |
| Metrics | Performance metrics, request rates, latencies |
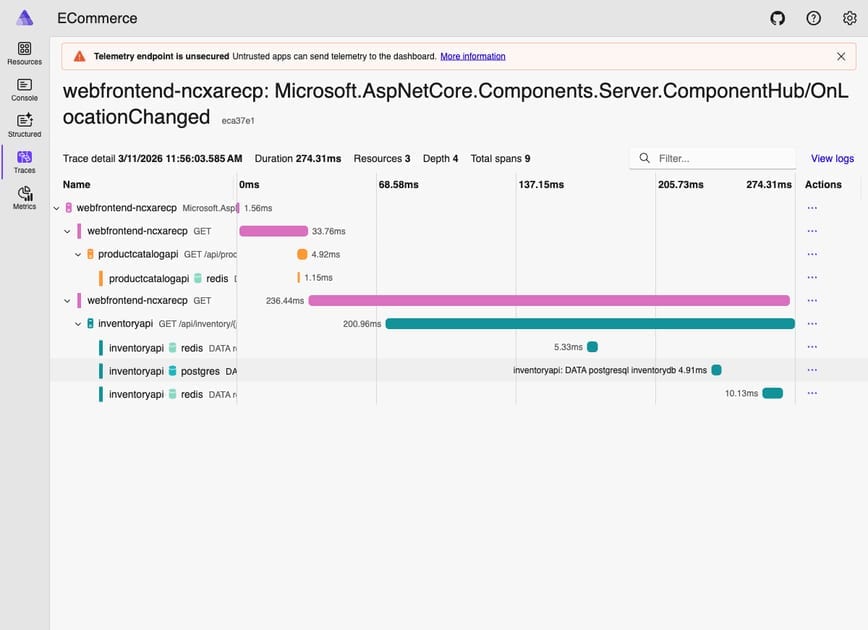
Tracing a Request Across Services
Debugging an order creation that touches 4 services without this tooling means:
- SSH into each container
- Grep through logs for correlation IDs
- Manually piece together the request flow
- Spending hours on what should take minutes
With Aspire Dashboard, click on a trace and see the entire flow:
[webfrontend] POST /checkout → 245ms └── [ordersapi] POST /api/orders → 180ms ├── [inventoryapi] POST /api/inventory/check → 45ms │ └── [Redis] GET inventory:product:1 → 2ms └── [RabbitMQ] Publish order.created → 5ms ├── [inventoryapi] Consume order.created → 30ms └── [notificationsapi] Consume order.created → 50msThat trace view alone has saved me hours of debugging.
Event-Driven Architecture with RabbitMQ
Microservices communicate best through events. Synchronous HTTP calls create tight coupling; if the Inventory service is down, should the Orders service fail too? Event-driven architecture solves this by decoupling services through a message broker.
Our e-commerce app uses RabbitMQ for asynchronous communication:
The Event Flow
When a customer places an order:
- Orders API creates the order in its database
- Orders API publishes an
OrderCreatedevent to RabbitMQ - Inventory API consumes the event and deducts stock (asynchronously)
- Notifications API consumes the event and sends confirmation email (asynchronously)
The order is confirmed to the customer immediately. Stock deduction and email happen in the background, with no waiting.
sequenceDiagram    participant Orders as Orders API    participant MQ as RabbitMQ    participant Inventory as Inventory API    participant Notifications as Notifications API
    Orders->>MQ: Publish OrderCreated Event
    par Parallel Processing        MQ->>Inventory: OrderCreated Event        Inventory->>Inventory: Deduct Stock        Inventory->>Inventory: Create Reservation    and        MQ->>Notifications: OrderCreated Event        Notifications->>Notifications: Send Email    end
Setting Up RabbitMQ Consumer
Here’s how our Inventory service consumes order events:
public class OrderEventConsumer : BackgroundService{    private readonly IServiceProvider _serviceProvider;    private readonly IConnection _rabbitConnection;  // Injected by Aspire!    private readonly ILogger<OrderEventConsumer> _logger;
    public OrderEventConsumer(        IServiceProvider serviceProvider,        IConnection rabbitConnection,  // Auto-configured connection        ILogger<OrderEventConsumer> logger)    {        _serviceProvider = serviceProvider;        _rabbitConnection = rabbitConnection;        _logger = logger;    }
    protected override Task ExecuteAsync(CancellationToken stoppingToken)    {        _logger.LogInformation("OrderEventConsumer starting...");
        var channel = _rabbitConnection.CreateModel();
        // Declare exchange with topic routing        channel.ExchangeDeclare(            exchange: "orders.exchange",            type: ExchangeType.Topic,            durable: true,            autoDelete: false);
        // Declare queue for inventory service        channel.QueueDeclare(            queue: "orders.inventory",            durable: true,            exclusive: false,            autoDelete: false);
        // Bind queue to exchange with routing key        channel.QueueBind(            queue: "orders.inventory",            exchange: "orders.exchange",            routingKey: "order.created");
        var consumer = new EventingBasicConsumer(channel);        consumer.Received += (sender, args) =>        {            try            {                var body = Encoding.UTF8.GetString(args.Body.ToArray());                var orderEvent = JsonSerializer.Deserialize<OrderCreatedEvent>(body);
                if (orderEvent != null)                {                    _logger.LogInformation("Processing order: {OrderId}", orderEvent.OrderId);
                    // Create scope for scoped services                    using var scope = _serviceProvider.CreateScope();                    var inventoryService = scope.ServiceProvider                        .GetRequiredService<InventoryService>();
                    // Deduct inventory for all items in the order                    inventoryService.DeductInventoryAsync(                        orderEvent.OrderId,                        orderEvent.Items                    ).GetAwaiter().GetResult();                }
                // Acknowledge successful processing                channel.BasicAck(args.DeliveryTag, multiple: false);            }            catch (Exception ex)            {                _logger.LogError(ex, "Error processing order event");                // Requeue for retry                channel.BasicNack(args.DeliveryTag, multiple: false, requeue: true);            }        };
        channel.BasicConsume(            queue: "orders.inventory",            autoAck: false,  // Manual acknowledgment            consumer: consumer);
        _logger.LogInformation("Waiting for order events...");
        // Keep running until cancellation        stoppingToken.Register(() =>        {            channel.Close();            channel.Dispose();        });
        return Task.CompletedTask;    }}
Adding RabbitMQ in Your Service
The RabbitMQ connection is automatically configured by Aspire:
// In Program.cs - One line!builder.AddRabbitMQClient("rabbitmq");
// The IConnection is now available for dependency injection// Connection string, credentials - all handled automatically
The Shared Event Contract
Services communicate through a shared contract:
// In ECommerce.Shared.Contracts projectpublic record OrderCreatedEvent{    public Guid OrderId { get; init; }    public string OrderNumber { get; init; }    public string UserId { get; init; }    public decimal TotalAmount { get; init; }    public List<OrderItemEvent> Items { get; init; }    public DateTime CreatedAt { get; init; }}
public record OrderItemEvent{    public int ProductId { get; init; }    public string ProductName { get; init; }    public int Quantity { get; init; }    public decimal UnitPrice { get; init; }}
Benefits of This Approach
| Benefit | Description |
|---|---|
| Loose Coupling | Services don’t need to know about each other |
| Resilience | If Inventory is down, orders still process |
| Scalability | Add more consumers to handle load |
| Auditability | Events provide natural audit trail |
| Eventual Consistency | Stock eventually reflects orders |
The .WithManagementPlugin() call provisions the RabbitMQ Management UI automatically, reachable straight from the Aspire Dashboard resource list.
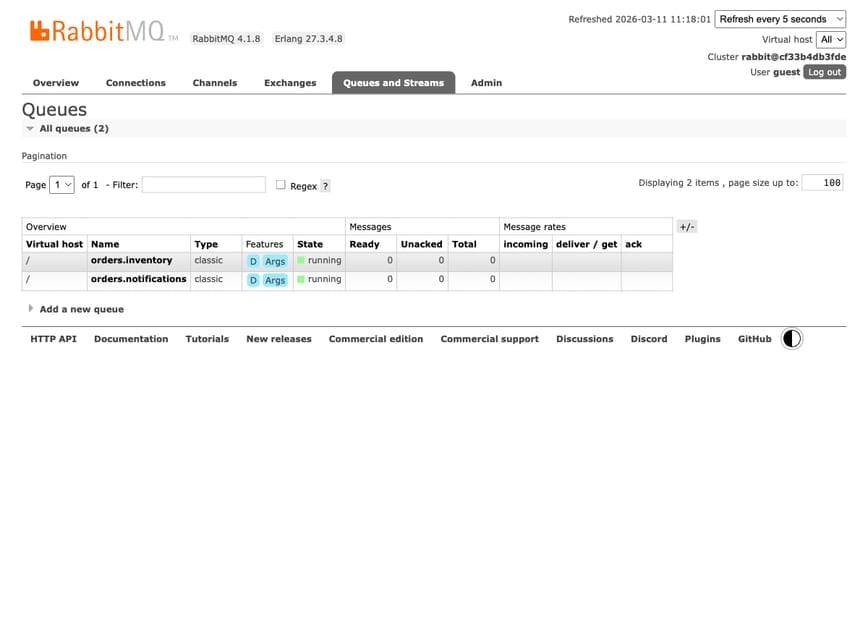
orders.inventory and orders.notifications queues visible, both running and durable. This comes from a single .WithManagementPlugin() call in the AppHost.Caching with Redis
Every product page view hitting the database doesn’t scale. Redis gives you sub-millisecond reads and keeps database load in check.
Adding Redis in Aspire
// In AppHostvar redis = builder.AddRedis("redis")    .WithRedisCommander();  // Visual inspection tool
// In Product Catalog APIbuilder.AddRedisClient("redis");
Cache-Aside Pattern Implementation
Our Product Catalog service uses the cache-aside (lazy-loading) pattern:
// In Program.csbuilder.AddRedisClient("redis");
// In ProductCatalogServicepublic class ProductCatalogService{    private readonly CatalogDbContext _context;    private readonly IConnectionMultiplexer _redis;    private readonly ILogger<ProductCatalogService> _logger;    private static readonly TimeSpan CacheExpiry = TimeSpan.FromMinutes(5);
    public ProductCatalogService(        CatalogDbContext context,        IConnectionMultiplexer redis,  // Injected by Aspire        ILogger<ProductCatalogService> logger)    {        _context = context;        _redis = redis;        _logger = logger;    }
    public async Task<IEnumerable<ProductDto>> GetProductsAsync()    {        var cacheKey = "products:all";        var db = _redis.GetDatabase();
        // 1. Check cache first        var cached = await db.StringGetAsync(cacheKey);
        if (!cached.IsNullOrEmpty)        {            _logger.LogDebug("Cache hit for {CacheKey}", cacheKey);            return JsonSerializer.Deserialize<IEnumerable<ProductDto>>(cached!);        }
        // 2. Cache miss - query database        _logger.LogDebug("Cache miss for {CacheKey}, querying database", cacheKey);
        var products = await _context.Products            .Include(p => p.Category)            .Where(p => p.IsActive)            .Select(p => new ProductDto            {                Id = p.Id,                Name = p.Name,                Description = p.Description,                Price = p.Price,                ImageUrl = p.ImageUrl,                CategoryName = p.Category.Name            })            .ToListAsync();
        // 3. Store in cache for next request        await db.StringSetAsync(            cacheKey,            JsonSerializer.Serialize(products),            CacheExpiry);
        return products;    }
    public async Task InvalidateCacheAsync()    {        var db = _redis.GetDatabase();        await db.KeyDeleteAsync("products:all");        _logger.LogInformation("Product cache invalidated");    }}
Caching Strategy
| Service | What’s Cached | TTL | Invalidation |
|---|---|---|---|
| Product Catalog | Products, Categories | 5 min | On product update |
| Inventory | Stock levels | 1 min | On stock change, order events |
Why Redis Commander?
Adding .WithRedisCommander() gives you a web UI to:
- View all cached keys
- Inspect cache values
- Monitor memory usage
- Delete keys manually for debugging
I use this constantly when debugging cache issues.

.WithRedisCommander().Complete Data Flow: Placing an Order
Here’s the complete data flow when a customer places an order:
sequenceDiagram    actor User    participant Web as Blazor Web UI    participant Catalog as Product Catalog API    participant Users as User Management API    participant Orders as Orders API    participant Inventory as Inventory API    participant Notifications as Notifications API    participant Cache as Redis Cache    participant DB as PostgreSQL    participant MQ as RabbitMQ
    Note over User,MQ: Phase 1: Browse Products    User->>Web: Browse Products    Web->>Catalog: GET /api/products    Catalog->>Cache: Check Cache    alt Cache Hit        Cache-->>Catalog: Return Cached Data    else Cache Miss        Catalog->>DB: Query catalogdb        DB-->>Catalog: Product Data        Catalog->>Cache: Store in Cache    end    Catalog-->>Web: Product List    Web-->>User: Display Products
    Note over User,MQ: Phase 2: User Authentication    User->>Web: Login    Web->>Users: POST /api/auth/login    Users->>DB: Validate Credentials    DB-->>Users: User Data    Users-->>Web: JWT Token
    Note over User,MQ: Phase 3: Checkout    User->>Web: Place Order    Web->>Inventory: POST /api/inventory/check    Inventory-->>Web: Stock Available    Web->>Orders: POST /api/orders (JWT)    Orders->>DB: Create Order    Orders->>MQ: Publish OrderCreated
    par Async Processing        MQ->>Inventory: Deduct Stock        MQ->>Notifications: Send Email    end
    Orders-->>Web: Order Confirmation    Web-->>User: Display Order Number
Database Per Service Pattern
The database-per-service pattern gives each service full ownership of its data. No shared schemas, no cross-service queries, no coordination nightmares.
Why Separate Databases?
| Benefit | Description |
|---|---|
| Data Isolation | Services can’t accidentally read/write each other’s data |
| Independent Scaling | Scale databases based on service-specific load |
| Technology Freedom | Each service could use a different database type |
| Schema Independence | Change schema without coordinating with other teams |
| Fault Isolation | Database issues don’t cascade to other services |
Our Database Structure
| Service | Database | Tables | Purpose |
|---|---|---|---|
| Product Catalog | catalogdb | Products, Categories | Product information |
| User Management | usersdb | Users, Roles, Claims | Identity & authentication |
| Orders | ordersdb | Orders, OrderItems | Order records |
| Inventory | inventorydb | Inventory, Reservations | Stock management |
| Notifications | notificationsdb | EmailLogs | Notification history |
How Aspire Makes This Easy
Without Aspire, you’d need to:
- Create 5 databases manually
- Configure 5 connection strings
- Manage migrations for each
- Handle credentials securely
With Aspire:
var postgres = builder.AddPostgres("postgres");
var catalogDb = postgres.AddDatabase("catalogdb");var usersDb = postgres.AddDatabase("usersdb");var ordersDb = postgres.AddDatabase("ordersdb");var inventoryDb = postgres.AddDatabase("inventorydb");var notificationsDb = postgres.AddDatabase("notificationsdb");
Five lines create all databases, configure them, and inject connection strings into each service.
Running the Demo
Here’s how to run it yourself.
Prerequisites Checklist
Quick Start
# 1. Clone the repositorygit clone https://github.com/nitin27may/aspire-Microservices.gitcd aspire-Microservices
# 2. Navigate to AppHostcd src/ECommerce.AppHost
# 3. Run the applicationdotnet run
What Happens Next
When you run dotnet run, here’s the sequence:
1. Pulling PostgreSQL image...2. Pulling Redis image...3. Pulling RabbitMQ image...4. Starting PostgreSQL container...5. Creating databases: catalogdb, usersdb, ordersdb, inventorydb, notificationsdb6. Starting Redis container...7. Starting RabbitMQ container...8. Waiting for health checks...9. Starting productcatalogapi...10. Starting usermanagementapi...11. Starting inventoryapi...12. Starting ordersapi...13. Starting notificationsapi...14. Starting webfrontend...15. Aspire Dashboard available at: https://localhost:17198Access Points
| Service | URL | Description |
|---|---|---|
| Aspire Dashboard | https://localhost:17198 | Monitoring, logs, traces |
| Web Frontend | Shown in dashboard | E-commerce store UI |
| PgAdmin | Shown in dashboard | Database management |
| Redis Commander | Shown in dashboard | Cache inspection |
| RabbitMQ Management | Shown in dashboard | Message broker UI |
| API Documentation | Each API at /scalar/v1 | Interactive API docs |
Demo Credentials
| Password | Role | |
|---|---|---|
demo@example.com | Demo123! | Customer |
test@example.com | Test123! | Customer |
PgAdmin launches at the URL shown in the Aspire Dashboard resources list, with no separate install and no manual configuration.
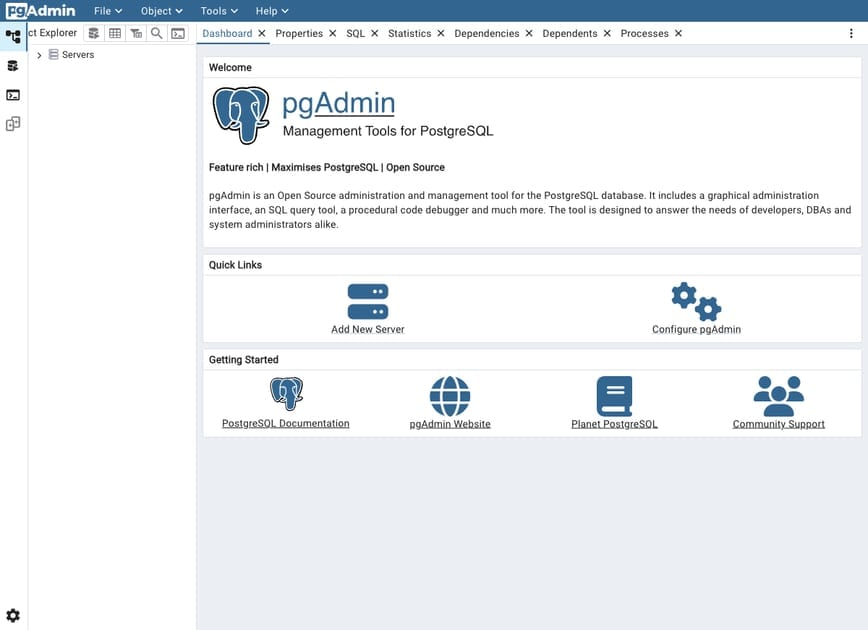
.WithPgAdmin(). Connect to any of the Aspire-managed PostgreSQL instances directly from this UI.Try the Complete User Flow
- Browse Products - Navigate categories, search, filter
- Add to Cart - Products stored in browser localStorage
- Create Account - Or use demo credentials
- Checkout - Watch inventory validation happen
- View Order - Check order history
- Observe - Open the Aspire Dashboard to see traces.
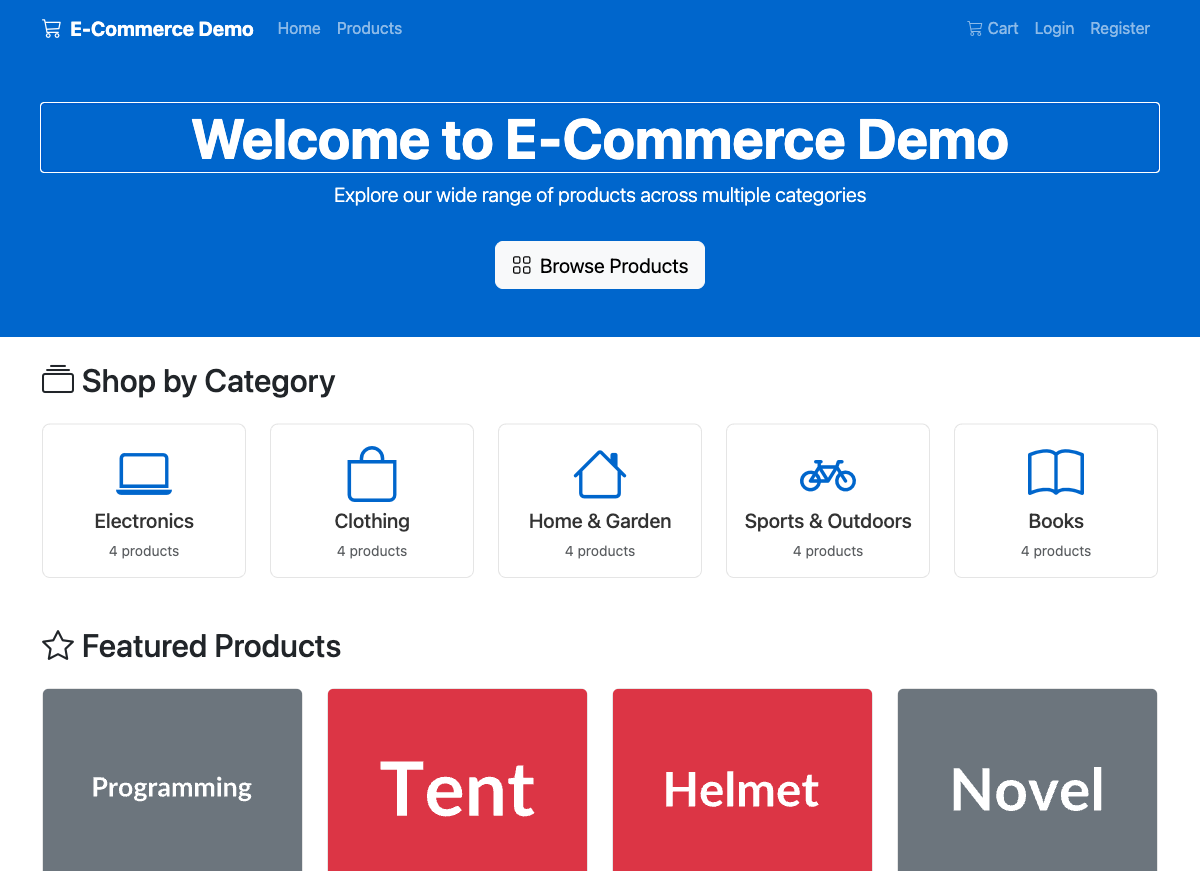
Before vs After: The Real Impact
Here’s the difference Aspire makes.
Before Aspire (Traditional Approach)
The Day 1–4 walkthrough up top is the long version of this. Compressed, the traditional setup is:
- A 50-line
docker-compose.ymlfor Postgres, Redis, and RabbitMQ, each with its own health check - A connection-string block duplicated across every service’s
appsettings.json, plus a separate.envfor production - A manual
HttpClientbase address (or a full Consul setup) for service discovery - An OpenTelemetry block wired into each service, pointing at Jaeger and Prometheus
Counted up, that’s 200+ lines of configuration across a dozen files, and none of it is your application code.
With Aspire
// Program.cs - ONE file, ~50 lines totalvar builder = DistributedApplication.CreateBuilder(args);
var postgres = builder.AddPostgres("postgres").WithPgAdmin();var catalogDb = postgres.AddDatabase("catalogdb");var redis = builder.AddRedis("redis").WithRedisCommander();var rabbitMq = builder.AddRabbitMQ("rabbitmq").WithManagementPlugin();
var catalogApi = builder.AddProject<Projects.CatalogApi>("catalogapi")    .WithReference(catalogDb)    .WithReference(redis)    .WaitFor(catalogDb);
// ... other services
builder.Build().Run();
Total: ~50 lines in ONE file. That’s it.
Side-by-Side Comparison
| Challenge | Traditional Approach | .NET Aspire Solution | Time Saved |
|---|---|---|---|
| Infrastructure | Docker Compose + manual config | builder.AddPostgres() | Hours → Seconds |
| Connection Strings | appsettings.json, env vars, secrets | Automatic injection | Manual → Automatic |
| Service Discovery | Consul, Eureka, or hardcoded URLs | Built-in with WithReference() | Days → Minutes |
| Observability | OpenTelemetry + Jaeger/Zipkin setup | AddServiceDefaults() | Days → One Line |
| Local Development | Multiple terminals, manual starts | Single dotnet run | N terminals → 1 |
| Startup Order | Docker depends_on (unreliable) | WaitFor() with health checks | Flaky → Reliable |
| Management UIs | Install separately, configure | Method chaining | Setup → Built-in |
| Debugging | Log diving, correlation IDs | Aspire Dashboard traces | Hours → Minutes |
Project Structure
For reference, here’s how the e-commerce demo is organized:
aspire-Microservices/├── ECommerce.sln # Solution file├── docs/│ ├── architecture-overview.md # Architecture diagram│ ├── data-flow-diagram.md # Sequence diagrams│ └── blog-article.md # This article└── src/ ├── ECommerce.AppHost/ # Aspire orchestration │ └── Program.cs # All infrastructure defined here ├── ECommerce.ServiceDefaults/ # Shared configuration │ └── Extensions.cs # OpenTelemetry, health checks ├── ECommerce.ProductCatalog.Api/ # Products microservice ├── ECommerce.UserManagement.Api/ # Users microservice ├── ECommerce.Orders.Api/ # Orders microservice ├── ECommerce.Inventory.Api/ # Inventory microservice ├── ECommerce.Notifications.Api/ # Notifications microservice ├── ECommerce.Web/ # Blazor frontend └── Shared/ └── ECommerce.Shared.Contracts/ # Event contractsKey Takeaways
After building this e-commerce demo, here’s what actually stuck:
What Aspire is NOT
- Not a replacement for Kubernetes - Aspire focuses on development, K8s on production orchestration
- Not a deployment tool - You still need Azure Container Apps, K8s, or similar for production
- Not an opinionated business framework - It’s infrastructure abstraction, not application architecture
When to Use .NET Aspire
| Use Case | Recommendation |
|---|---|
| New .NET microservices project | Strongly recommended |
| Existing .NET project | Worth migrating for observability alone |
| Polyglot microservices (Node.js, Python, Go) | Aspire can orchestrate any language |
| Non-.NET services | Use AddNpmApp(), AddPythonApp(), or AddContainer() |
| Learning microservices | Perfect for understanding patterns |
| Team with varied experience | Lowers barrier to entry significantly |
Where to take it next
.NET Aspire handles the infrastructure plumbing that used to eat the first days of a project. Connection strings, service discovery, and observability are all defined in C# and managed for you.
The patterns in this demo are the ones I reach for on real projects: microservices with clear boundaries, event-driven communication over RabbitMQ, cache-aside reads on Redis, database-per-service, JWT across services, and distributed tracing you can actually read.
Clone the repo and run dotnet run from the AppHost. Open the Aspire Dashboard, place an order, and watch a single trace fan out across every service. That’s the fastest way to feel what Aspire gives you. If you’re on an existing .NET codebase, the next post covers adding Aspire without a rewrite.
Resources and Further Reading
Official Documentation
- .NET Aspire Overview3
- Setup and Tooling4
- Build Your First Aspire App5
- Aspire Integrations
This Demo
Related Topics
Questions or feedback? Open an issue on GitHub or connect with me.
References
-
.NET 9 SDK — dotnet.microsoft.com ↩
-
Docker Desktop — docker.com ↩
-
.NET Aspire Overview — learn.microsoft.com ↩
-
Setup and Tooling — learn.microsoft.com ↩
-
Build Your First Aspire App — learn.microsoft.com ↩
Comments
Comments are GitHub discussions. Sign in with GitHub to post; reactions need no account.