
My first serious Codespaces session was a demo I nearly cancelled. I wanted to show my mean-docker starter (Angular, Express, MongoDB, everything in Docker Compose) to someone whose laptop had none of that installed. No Node, no Docker Desktop, no MongoDB. Instead of walking them through an afternoon of setup, I clicked “Create codespace” on the repo and had the full stack running in a browser tab a few minutes later.
That sold me faster than any feature page could. The idea is plain: GitHub provisions a Linux VM, clones your repo into it, and serves you a full VS Code instance in the browser. Docker is already there. Git is already authenticated. The catch is that compute draws from your account quota, and some workloads still belong on local hardware. I cover both sides below.
What’s covered#
- Launching a Codespace from any repository, and what happens on first boot
- Running Docker and Docker Compose without Docker Desktop
- Port forwarding: getting your app into a browser tab and sharing it with teammates
- DevContainers: defining the team’s environment as code in the repo
- Troubleshooting, cost control, and the cases where I would stay local
What is GitHub Codespaces?#
GitHub Codespaces is a cloud-hosted development environment: a Linux VM running a full Visual Studio Code instance that you use from the browser (or attach to from desktop VS Code). In practice that means:
- Nothing to install locally: runtimes, SDKs, and tools live on the VM
- One setup for the whole team: the environment is defined in the repo, not on individual laptops
- Full VS Code: extensions, terminal, and debugging behave like the desktop app, keyboard shortcuts included
- Docker without Docker Desktop: containers run on the VM, which also sidesteps Docker Desktop licensing on work machines
- Any device: a browser is enough; a tablet works fine for a quick review
Setting up your Codespace#
1. Accessing Codespaces#
There are two ways to launch a Codespace for your repository:
Method 1: From the repository page
- Navigate to your GitHub repository
- Click the green “Code” button (or “Use this template” for template repositories)
- Select the “Codespaces” tab in the dropdown
- Click “Create codespace on main” (or your default branch)
For example, I’ve used the repository below:
nitin27may/mean-docker: A jumpstart project built with the MEAN stack (Angular 18.1.0, Express.js 4.17.1, MongoDB) featuring Docker support and styled with Bootstrap 5. (github.com)

Method 2: Using the dropdown menu
- Go to your repository
- Click the “Code” dropdown
- Click “Create codespace on main” (or your default branch)

2. Understanding the Codespace interface#
Once your Codespace loads, you’ll see a familiar VS Code interface in your browser:
- Explorer: File browser on the left sidebar
- Source Control: Git integration
- Extensions: VS Code extensions that come pre-installed or can be added
- Terminal: Integrated Linux terminal at the bottom
- Editor: Main coding area in the center

It works like VS Code on your desktop, including keyboard shortcuts. There is no separate tool to learn.
3. Running the project#
When your Codespace launches, you can start working immediately:
- Terminal access: Click on “Terminal” in the top menu, then “New Terminal” to open a command line interface
- Installing dependencies: Run any setup commands like
npm installorpip install -r requirements.txt - Environment variables: Set them through the VS Code interface or configuration files
Working with Docker in Codespaces:
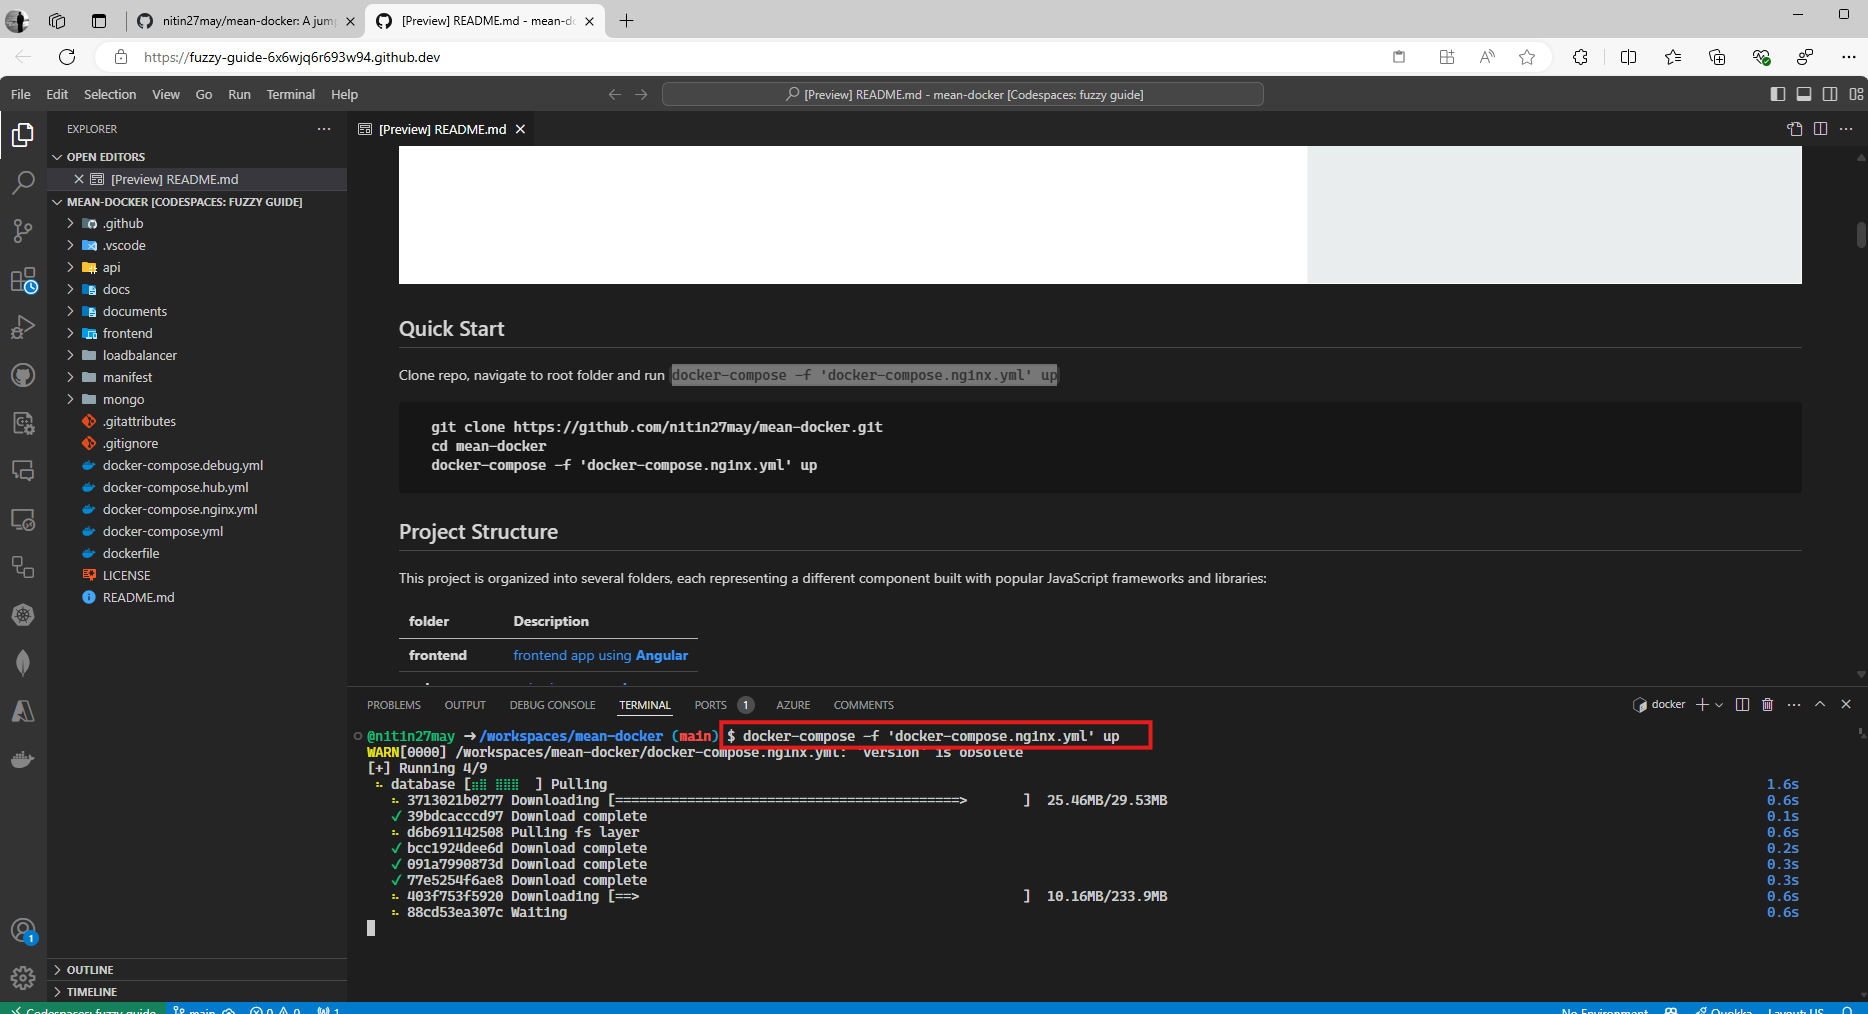
This is the feature that made Codespaces stick for me. You can run Docker commands without having Docker Desktop installed locally:
- To start containers defined in a Docker Compose file, run:
docker-compose up - For specific compose files, specify the file:
docker-compose -f 'docker-compose.nginx.yml' up
Git comes pre-configured with your GitHub identity. You can commit and push from the Source Control tab without any credential setup.
4. Managing ports and accessing your application#
When you run applications in Codespaces, they need to be reachable from your browser. Codespaces handles this through port forwarding:
- Automatic port detection: When your application starts (a web server, an API), Codespaces detects the open ports
- Port forwarding notification: A popup appears notifying you that a port has been forwarded
- Visibility options: Ports can be public (anyone with the link can access) or private (only you); change this from the PORTS tab

Accessing your running application:
- Click “Open in Browser” from the notification
- Or find the “Ports” tab at the bottom of the screen to see all forwarded ports
- Click the globe icon next to any port to open it in a new browser tab

localhost instead of 0.0.0.0, which port forwarding can’t see. Fix the bind address, or add the port manually in the Ports tab (3000 for many Node.js apps, 8000 for many Python apps).Customizing your Codespace with DevContainers#
DevContainers are where Codespaces stops being a convenience and becomes a team standard. They let you define the entire development environment as code, checked into the repo next to the application it serves.
What are DevContainers?#
DevContainers are Docker containers configured specifically for development. They give you:
- The same development environment for every team member
- Pre-installed tools, runtimes, and dependencies
- Custom VS Code extensions installed automatically
- Standardized workspace configurations
Setting up a DevContainer#
Create configuration files: Add a
.devcontainerfolder to your repository with:devcontainer.json: Defines the container configuration and VS Code settingsDockerfile: Custom image definition (optional)
Basic
devcontainer.jsonexample:
{
  "name": "My Project Dev Environment",
  "image": "mcr.microsoft.com/devcontainers/javascript-node:0-18",
  "customizations": {
    "vscode": {
      "extensions": [
        "dbaeumer.vscode-eslint",
        "esbenp.prettier-vscode"
      ],
      "settings": {
        "editor.formatOnSave": true
      }
    }
  },
  "forwardPorts": [3000, 5000],
  "postCreateCommand": "npm install"
}
This example:
- Uses a Node.js base image
- Installs ESLint and Prettier extensions
- Enables format on save
- Forwards ports 3000 and 5000
- Runs
npm installwhen the container is created
Troubleshooting#
Codespace is slow to start or respond#
- Try a larger machine type (Settings → Machine type)
- Close browser tabs you’re not using to free up local resources
- Check your internet connection; Codespaces needs a stable one
Port forwarding isn’t working#
- Confirm your application is binding to
0.0.0.0, notlocalhost - Try manually adding the port in the Ports panel
- Check whether a firewall or corporate network is blocking connections
Git authentication problems#
- Codespaces handles GitHub authentication automatically
- For other Git providers, add SSH keys through the terminal or use credential helpers
Docker container issues#
- Check container logs with
docker logs [container_name] - Verify your Dockerfile or docker-compose file is formatted correctly
- Be aware of file permission differences between Windows and Linux
Best practices#
Use dotfiles for personalization#
Create a dotfiles repository and GitHub applies it to every new Codespace you create: your shell aliases, prompt, and editor preferences follow you. See Personalizing Codespaces with dotfiles.
Handle secrets properly#
Use GitHub repository secrets for sensitive information and read them in Codespaces through the secrets context. Never hardcode credentials in the repository.
Control cost#
Codespaces usage consumes your GitHub quota or incurs charges. Set the automatic shutdown timeout (default is 30 minutes), stop machines you aren’t using, and pick the smallest machine type that handles your workload.
Use pre-builds for faster startup#
For repositories you open often, set up pre-built containers in repository settings. Pre-builds cut startup time for large projects because the image is baked before you ask for it.
For teams: standardize and share#
Put the DevContainer in the repo so every member gets an identical environment, and document any manual steps that remain. To share a running app for review, make its port public from the Ports tab and send the generated URL.
Where local development still wins#
Codespaces is not the answer to everything, and pretending otherwise is how teams end up with surprise bills.
- Quota burn: every hour of compute draws from your quota or your card. If you code eight hours a day on the same project, hardware you own is cheaper.
- Latency and offline work: typing over a weak connection is miserable, and there is no offline mode. Flights and trains rule it out.
- Heavy or specialized workloads: GPU jobs, large local datasets, and native mobile development (iOS simulators in particular) don’t fit the model.
Real-world use cases#
Where Codespaces has actually earned its keep for me:
- Onboarding new developers: a new team member codes within minutes instead of spending days on environment setup, and their environment matches everyone else’s exactly.
- Short-term contributions: quick bug fixes, small features, and open-source drive-bys don’t justify a full local setup.
- Teaching and workshops: instructors prepare the environment once; students need nothing but a browser, and support questions drop because every machine is identical.
- Cross-platform development: work on Linux-targeted projects from Windows or macOS, and compile natively on the target platform without VMs or dual-booting.
Worth remembering#
- Codespaces pays off at the edges of a project: onboarding, demos, workshops, and one-off contributions. Day-in day-out development on one machine is where the economics get questionable.
- The environment definition belongs in the repo as a
.devcontainer, not in a wiki page of setup steps that rots. - Apps must bind to
0.0.0.0to be port-forwarded;localhostbinds are the most common “it doesn’t work” cause. - Treat quota like money, because it is: idle timeout on, machines stopped, smallest machine type that does the job.
Where to start#
Open a repository you already know, create a Codespace on it, and run the project end to end; that one session teaches you more than any article. If you want a project with Docker Compose already wired up, fork mean-docker and start there. When you outgrow the defaults, the official Codespaces documentation and the DevContainer reference cover machine types, billing, and every devcontainer.json option.