Docker Guide
This guide explains the Docker setup for the Clean Architecture Full-Stack application. It covers all Dockerfiles, docker-compose configurations, and environment variables.
Table of Contents
- Overview
- Dockerfiles
- Docker Compose Configuration
- Pre-built Images (GHCR) Docker Compose
- Environment Variables (.env file)
- Running the Application with Docker
- Database Initialization
- Production Deployment Considerations
- Conclusion
Overview
The application uses Docker to containerize all services for consistent development and deployment. This containerization approach ensures that the application runs the same way in all environments, from development to production.
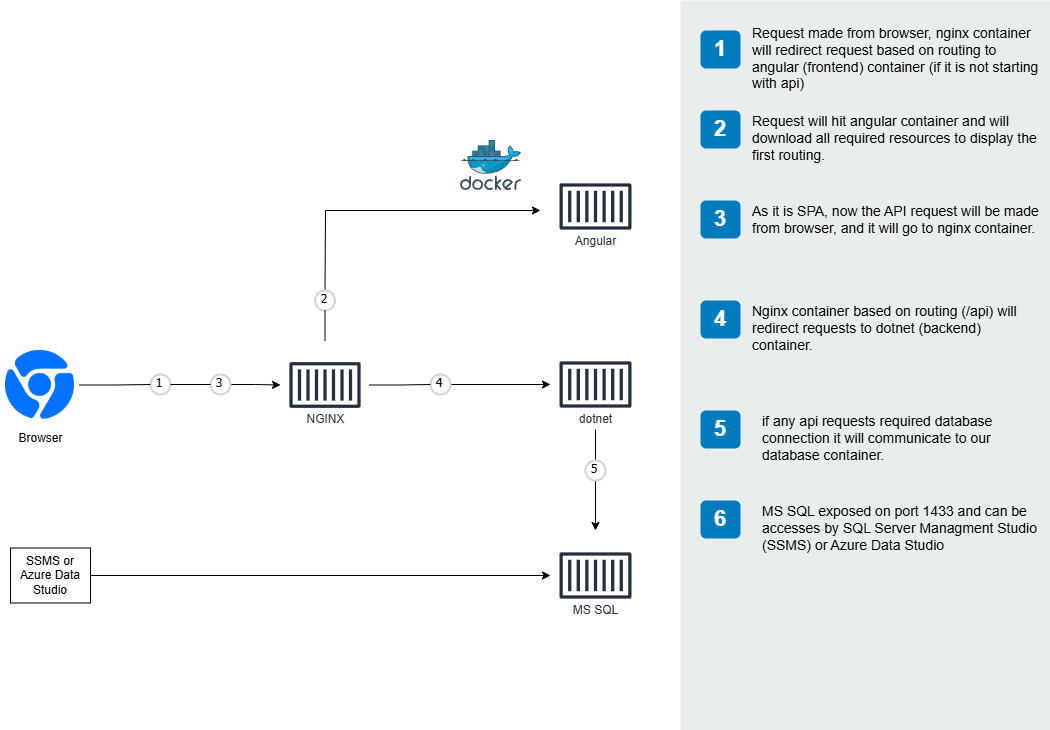
Architecture diagram showing the containerized application components
The Docker setup includes:
- Frontend container (Angular 21)
- Backend API container (.NET 10)
- Database container (PostgreSQL 17)
- pgAdmin container (Database management)
- Nginx container (Reverse proxy/Load balancer)
Tip: For local development, consider using .NET Aspire which provides a streamlined experience with automatic service discovery and an integrated dashboard.
Dockerfiles
Frontend Dockerfile
Located at frontend/Dockerfile, this file builds the Angular application:
# Build stage
FROM node:22-alpine AS build
WORKDIR /app
COPY package*.json ./
RUN npm ci
COPY . .
RUN npm run build

# Production stage
FROM nginx:alpine
COPY --from=build /app/dist/browser /usr/share/nginx/html
COPY nginx.conf /etc/nginx/conf.d/default.conf
EXPOSE 80
CMD ["nginx", "-g", "daemon off;"]
This is a multi-stage build that:
- Uses Node.js to build the Angular application
- The
node:20-alpineimage provides a lightweight environment for building npm ciensures exact dependency versions are installed- Angular build process creates optimized production assets
- The
- Copies the built files to an Nginx container
- Only the compiled assets are transferred to the final image
- This significantly reduces the final image size
- Uses a custom Nginx configuration
- Properly handles Angular’s routing requirements
- Configures caching and compression settings
- Exposes port 80 for web traffic
Backend Dockerfile
Located at backend/src/Dockerfile, this file builds the .NET API:
FROM mcr.microsoft.com/dotnet/aspnet:10.0 AS base
WORKDIR /app
EXPOSE 8000
ENV ASPNETCORE_URLS=http://+:8000
RUN groupadd -g 2000 dotnet \
    && useradd -m -u 2000 -g 2000 dotnet
USER dotnet

# Build stage
FROM mcr.microsoft.com/dotnet/sdk:10.0 AS build
ARG BUILD_CONFIGURATION=Release
ARG DOTNET_SKIP_POLICY_LOADING=true
WORKDIR /src
COPY ["Contact.Api/Contact.Api.csproj", "Contact.Api/"]
COPY ["Contact.Application/Contact.Application.csproj", "Contact.Application/"]
COPY ["Contact.Domain/Contact.Domain.csproj", "Contact.Domain/"]
COPY ["Contact.Infrastructure/Contact.Infrastructure.csproj", "Contact.Infrastructure/"]
RUN dotnet restore "Contact.Api/Contact.Api.csproj"
COPY . .
WORKDIR "/src/Contact.Api"
RUN dotnet build "Contact.Api.csproj" -c $BUILD_CONFIGURATION -o /app/build

# Publish stage
FROM build AS publish
ARG BUILD_CONFIGURATION=Release
RUN dotnet publish "Contact.Api.csproj" -c $BUILD_CONFIGURATION -o /app/publish /p:UseAppHost=false

# Final stage
FROM base AS final
WORKDIR /app
COPY --from=publish /app/publish .
ENTRYPOINT ["dotnet", "Contact.Api.dll"]
This uses a multi-stage build to:
- Define the base ASP.NET Core runtime environment
- Sets up the proper user permissions for security
- Configures the application to listen on port 8000
- Build the application using the .NET SDK
- Restores NuGet packages efficiently by copying only project files first
- This optimizes Docker layer caching for faster rebuilds
- Publish the application
- Creates a production-ready version with all dependencies
- Create a lightweight runtime image
- Only includes the compiled application and runtime dependencies
- Significantly reduces the attack surface and image size
Nginx Loadbalancer Dockerfile
Located at loadbalancer/Dockerfile, this serves as the entry point for all requests:
FROM nginx:alpine
COPY nginx.conf /etc/nginx/conf.d/default.conf
This simple Dockerfile:
- Uses the official Nginx Alpine image for a minimal footprint
- Replaces the default configuration with our custom one that routes traffic to the appropriate services
The accompanying nginx.conf contains the reverse proxy configuration:
server {
    listen 80;

    location / {
        proxy_pass http://frontend;
        proxy_set_header Host $host;
        proxy_set_header X-Real-IP $remote_addr;
        proxy_set_header X-Forwarded-For $proxy_add_x_forwarded_for;
        proxy_set_header X-Forwarded-Proto $scheme;
    }

    location /api {
        proxy_pass http://api:8000;
        proxy_set_header Host $host;
        proxy_set_header X-Real-IP $remote_addr;
        proxy_set_header X-Forwarded-For $proxy_add_x_forwarded_for;
        proxy_set_header X-Forwarded-Proto $scheme;
    }
}
This configuration:
- Routes all root requests (
/) to the frontend container - Routes all API requests (
/api) to the backend API container - Sets proper headers for security and proper client IP forwarding
Docker Compose Configuration
The primary docker-compose file is docker-compose.yml:
version: '3.8'

services:
  frontend:
    build:
      context: ./frontend
      dockerfile: Dockerfile
    container_name: frontend
    restart: always
    networks:
      - cleanarch-network
    depends_on:
      - api

  api:
    build:
      context: ./backend/src
      dockerfile: Dockerfile
    container_name: api
    restart: always
    environment:
      - ASPNETCORE_ENVIRONMENT=Production
      - ConnectionStrings__DefaultConnection=Host=db;Port=5432;Database=contacts;Username=postgres;Password=password
      - JwtSettings__Secret=${JWT_SECRET:-super-secret-key-for-jwt-authentication}
      - JwtSettings__ValidIssuer=${JWT_ISSUER:-CleanArchitectureApp}
      - JwtSettings__ValidAudience=${JWT_AUDIENCE:-CleanArchitectureAppUsers}
      - JwtSettings__ExpiryInDays=${JWT_EXPIRY_DAYS:-7}
    networks:
      - cleanarch-network
    depends_on:
      - db

  db:
    image: postgres:17-alpine
    container_name: db
    restart: always
    environment:
      - POSTGRES_USER=postgres
      - POSTGRES_PASSWORD=password
      - POSTGRES_DB=contacts
    ports:
      - "5432:5432"
    volumes:
      - postgres_data:/var/lib/postgresql/data
      - ./backend/scripts/seed-data.sql:/docker-entrypoint-initdb.d/seed-data.sql
    networks:
      - cleanarch-network

  loadbalancer:
    build:
      context: ./loadbalancer
      dockerfile: Dockerfile
    container_name: loadbalancer
    restart: always
    ports:
      - "80:80"
    networks:
      - cleanarch-network
    depends_on:
      - frontend
      - api

networks:
  cleanarch-network:
    driver: bridge

volumes:
  postgres_data:
This configuration:
- Defines all four services (frontend, api, db, loadbalancer)
- Each service is built from its respective Dockerfile
- Container names are specified for easier identification
- Establishes service dependencies to ensure proper startup order
- The API waits for the database
- The frontend waits for the API
- The loadbalancer waits for both frontend and API
- Sets environment variables for configuration
- Uses environment variables with defaults
- Database connection string points to the Postgres container
- JWT settings for authentication
- Configures networking
- All services are on a dedicated bridge network
- Only necessary ports are exposed
- Creates a persistent volume for PostgreSQL data
- Ensures data survives container restarts
- Preloads the database with seed data
Pre-built Images (GHCR) Docker Compose
For quick deployment without building locally, use docker-compose.ghcr.yml which pulls pre-built images from GitHub Container Registry:
services:
  frontend:
    image: ghcr.io/nitin27may/clean-architecture-docker-dotnet-angular/frontend:latest
    depends_on:
      - api
    networks:
      - postgres_network

  api:
    image: ghcr.io/nitin27may/clean-architecture-docker-dotnet-angular/api:latest
    environment:
      - ASPNETCORE__ENVIRONMENT=${ENVIRONMENT}
      - AppSettings__ConnectionStrings__DefaultConnection=Host=${POSTGRES_HOST};Port=${POSTGRES_PORT};Database=${POSTGRES_DB};Username=${POSTGRES_USER};Password=${POSTGRES_PASSWORD}
      # ... other environment variables
    depends_on:
      - postgres
    networks:
      - postgres_network

  postgres:
    image: postgres:17-alpine
    # ... configuration

  nginx:
    image: ghcr.io/nitin27may/clean-architecture-docker-dotnet-angular/loadbalancer:latest
    ports:
      - "80:80"
    depends_on:
      - frontend
      - api
    networks:
      - postgres_network
This configuration provides:
- Instant startup - No build time required
- Consistent images - Same images used in CI/CD
- Easy updates - Just pull latest images and restart
Available images on GHCR:
ghcr.io/nitin27may/clean-architecture-docker-dotnet-angular/frontend:latestghcr.io/nitin27may/clean-architecture-docker-dotnet-angular/api:latestghcr.io/nitin27may/clean-architecture-docker-dotnet-angular/loadbalancer:latest
Environment Variables (.env file)
The application uses a .env file (copied from .env.example) to configure various settings:
# Database Configuration
POSTGRES_USER=postgres
POSTGRES_PASSWORD=password
POSTGRES_DB=contacts
POSTGRES_CONNECTION_STRING=Host=db;Port=5432;Database=contacts;Username=postgres;Password=password

# JWT Authentication
JWT_SECRET=super-secret-key-for-jwt-authentication
JWT_ISSUER=CleanArchitectureApp
JWT_AUDIENCE=CleanArchitectureAppUsers
JWT_EXPIRY_DAYS=7
These variables configure:
- Database settings:
- Username, password, and database name
- Connection string for the API to connect to PostgreSQL
- JWT Authentication:
- Secret key for token signing
- Issuer and audience claims
- Token expiration time
Running the Application with Docker
Option 1: Using Pre-built Images (Fastest)
Run the application instantly using pre-built images from GitHub Container Registry:
# Copy the example environment file
cp .env.example .env

# Pull and start all services
docker compose -f docker-compose.ghcr.yml pull
docker compose -f docker-compose.ghcr.yml up -d
The application will be available at http://localhost.
Option 2: Build Locally
To build and run the application locally:
# Copy the example environment file
cp .env.example .env

# Customize environment variables if needed
# vim .env

# Build and start all services
docker-compose up --build -d
The application will be available at http://localhost.
Development Mode
For development, we recommend using .NET Aspire instead of Docker Compose. See the Aspire Guide for details.
Aspire provides:
- Hot reload for both frontend and backend
- Integrated dashboard with logs and traces
- Automatic service discovery
Useful Docker Commands
Here are some useful Docker commands for managing the application:
# View container logs
docker logs frontend
docker logs api
docker logs db

# Access a container's shell
docker exec -it api /bin/bash
docker exec -it db psql -U postgres contacts

# Stop all services
docker-compose down

# Rebuild a specific service
docker-compose build api
docker-compose up -d api

# Remove all data and start fresh
docker-compose down -v
docker-compose up -d
Database Initialization
The PostgreSQL container is initialized with seed data from backend/scripts/seed-data.sql:
-- Enable UUID generation
CREATE EXTENSION IF NOT EXISTS "uuid-ossp";

-- Create the schema
CREATE SCHEMA IF NOT EXISTS contacts;

-- Create tables
CREATE TABLE IF NOT EXISTS "Users" (
  "Id" uuid PRIMARY KEY DEFAULT uuid_generate_v4(),
  "FirstName" varchar(50) NOT NULL,
  "LastName" varchar(50) NOT NULL,
  "Email" varchar(100) UNIQUE NOT NULL,
  "Password" varchar(255) NOT NULL,
  "CreatedOn" timestamptz NOT NULL DEFAULT now(),
  "CreatedBy" uuid NULL
);

-- Additional tables and seed data...
This ensures that:
- The database is pre-populated with essential data
- Administrator user account
- Basic roles and permissions
- Sample contact records
- The schema is properly created
- All tables have appropriate constraints
- Indexes are created for performance
Production Deployment Considerations
When deploying to production, consider the following adjustments:
- Use real secrets management
- Don’t store sensitive values in .env files
- Use a secrets manager like Docker Secrets, Kubernetes Secrets, or HashiCorp Vault
- Configure proper SSL/TLS
- Add HTTPS configuration to the Nginx container
- Use Let’s Encrypt for free certificates
- Set up health checks
- Add HEALTHCHECK instructions to Dockerfiles
- Configure orchestration tool health probes
- Implement database backups
- Mount a backup volume
- Schedule regular backups using cron or a backup service
- Use container orchestration
- Consider Kubernetes or Docker Swarm for production
- Enables scaling, auto-healing, and rolling updates
Conclusion
This Docker setup provides a robust foundation for both development and production use of the Clean Architecture Full-Stack application. The containerized approach ensures consistency across environments and simplifies the deployment process.
For further information on individual components, refer to the Backend Guide and Frontend Guide.