Azure App Registration: A Complete Guide from Zero to Working App
Everything about Azure App Registration — application types, authentication flows, client secrets vs certificates, redirect URIs, and how tokens work.
Every Microsoft integration I have shipped starts at the same gate. Call the Graph API, wire up SharePoint, add “Sign in with Microsoft” to an app, and none of it works until you have an App Registration. Get it wrong and nothing downstream authenticates, which is why this is the one setup step I slow down for instead of clicking through.
Most of the trouble I have watched teams walk into comes from treating the registration as a form to fill in rather than a security boundary to design. This guide walks the whole object: what it creates, the application types, how authentication flows differ between them, when a certificate beats a secret, what “Expose an API” means, and how the tokens fit together.
What Azure App Registration Actually Creates
Azure Active Directory (now called Microsoft Entra ID, though the old name still appears everywhere in portal and docs) is Microsoft’s cloud identity provider. It handles authentication and authorization for Microsoft 365, Azure, and any application you register with it.
When you register an application, Azure AD creates two things:
- Application object: the global definition of your app, stored in the tenant where you registered it. This is what you manage in the portal.
- Service principal: an instance of that application in a specific tenant. Think of the application object as the class and the service principal as the instance. In single-tenant apps they live in the same tenant; in multi-tenant apps a service principal is created in every tenant where a user consents.
You interact almost entirely with the application object. The distinction matters when troubleshooting permission grants and consent.
Before You Register: Four Questions
1. What type of app is this? Web app (server-side), SPA (browser-only), mobile/desktop, or background service? This determines the authentication flow.
2. Who will sign in? Only people in your organization (single tenant), people in any Azure AD tenant (multi-tenant), or also personal Microsoft accounts?
3. Does the app call APIs on behalf of a user, or on its own? Delegated (acting as the user) vs application (acting as itself). This determines permission type.
4. Does this app expose its own API for others to call? If yes, you need to define scopes under “Expose an API.”
Registering Your First App
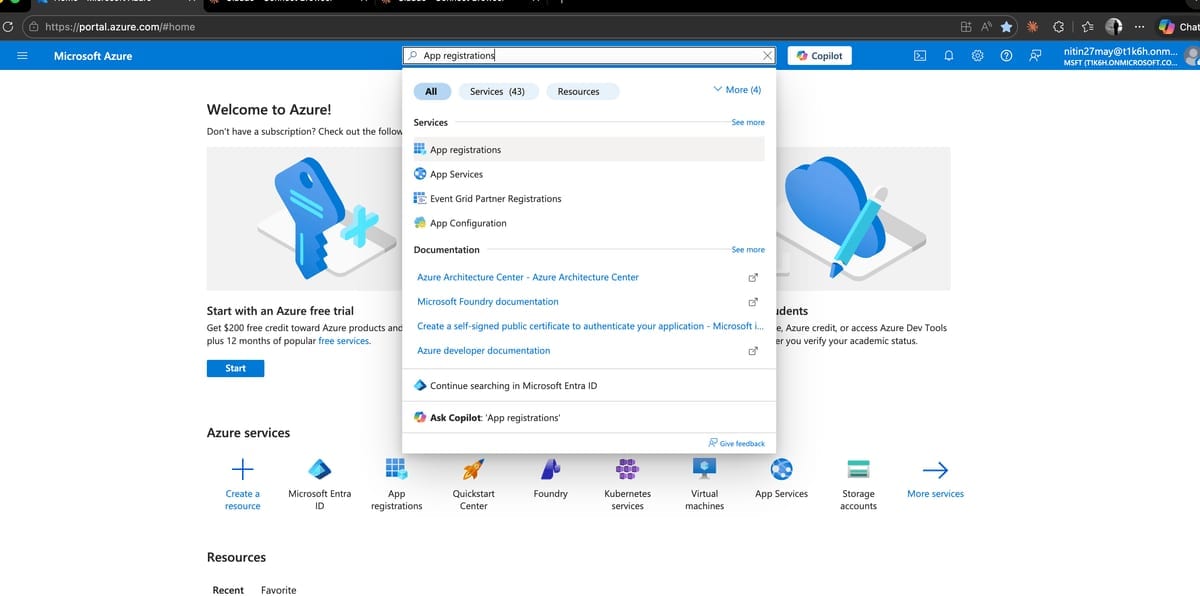
Step 1: Open App Registrations
Go to portal.azure.com → search App registrations → New registration.
Step 2: Fill in the Registration Form
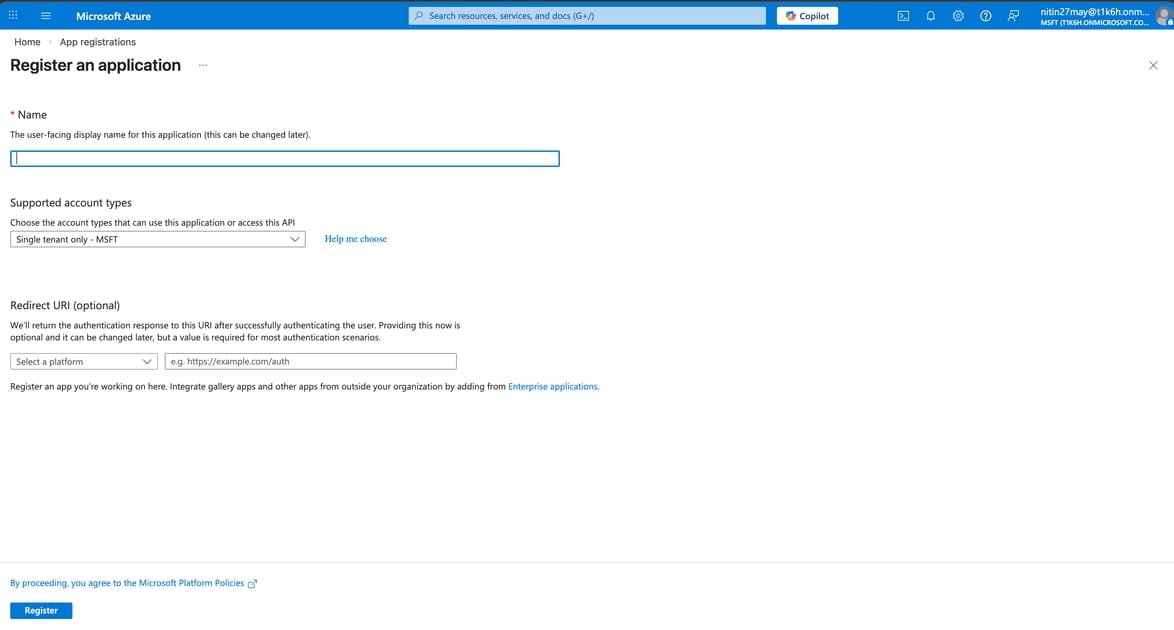
Name. The internal display name. End users see it on consent screens and in their app access lists under myapps.microsoft.com.
Supported account types. Three options:
| Option | What it means | Use when |
|---|---|---|
| Accounts in this organizational directory only | Single-tenant. Only your Azure AD tenant | Internal tools, intranet apps |
| Accounts in any organizational directory | Multi-tenant. Any Azure AD tenant can sign in | SaaS products sold to businesses |
| Accounts in any org directory + personal accounts | Multi-tenant + personal MSA | Consumer-facing apps (Outlook.com users, Xbox, etc.) |
You can change this later in the manifest if needed, but it has implications for token issuers, so choose correctly upfront.
Redirect URI. Where Azure AD sends the user after authentication. Optional at registration time, but you must add one before your app can complete a sign-in. Covered in detail below.
Step 3: Register
Click Register. Azure creates the app and takes you to its Overview blade.
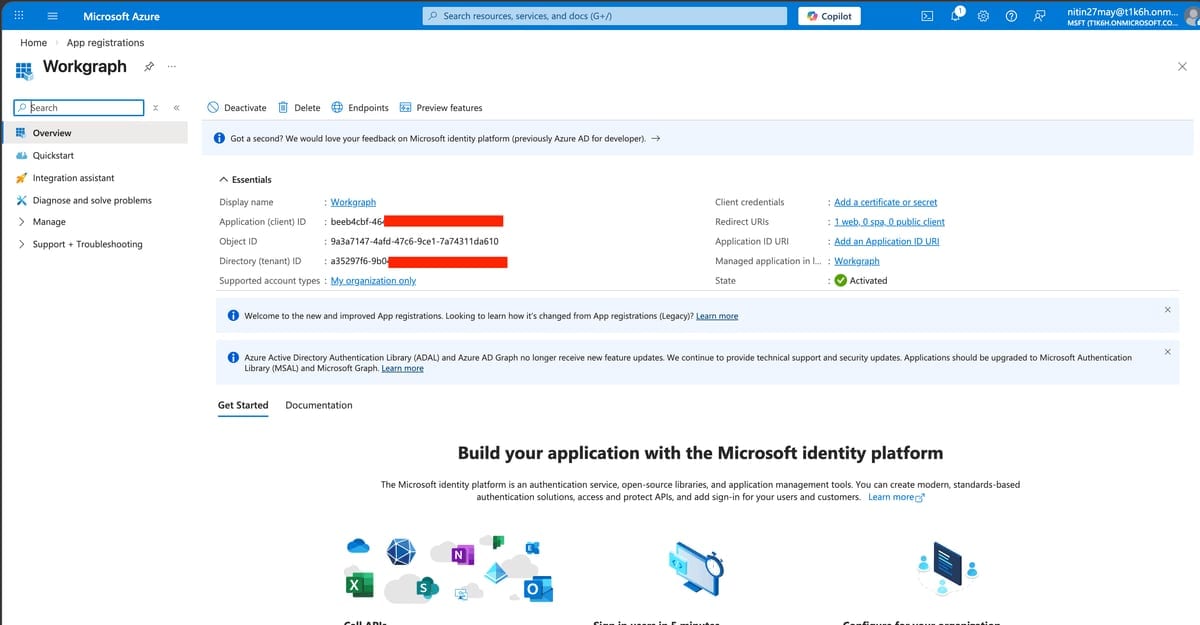
The Three IDs You Need
| ID | What it is | Where you use it |
|---|---|---|
| Application (client) ID | Unique identifier for your app | client_id in every auth request |
| Directory (tenant) ID | Your Azure AD tenant | Token endpoint URL, single-tenant token requests |
| Object ID | Internal Azure object ID | Microsoft Graph calls to manage the app itself |
The client ID and tenant ID go into your application config immediately. Store them as config values, not hardcoded strings.
Application Types and Authentication Flows
The type of application determines which OAuth 2.0 flow to use and whether your app can keep a secret. This is the most important concept to get right.
Confidential Clients vs Public Clients
Confidential clients can securely hold a secret because they run on a server you control: web apps, APIs, background services. The client secret or certificate never leaves your server.
Public clients cannot hold a secret. They run in environments you do not fully control: browsers, mobile apps, desktop apps. Any secret embedded in a SPA JavaScript bundle or a mobile APK is extractable.
Web Application (Confidential Client)
A traditional server-side web app: ASP.NET Core MVC, Next.js with a Node backend, Django, and the like.
Flow: Authorization Code flow (with or without PKCE, though PKCE is good practice even for confidential clients).
- User visits your app, is redirected to Azure AD login
- User authenticates, Azure AD redirects back to your redirect URI with an authorization code
- Your server exchanges the code for tokens using the client secret or certificate
- Tokens stay on the server; the browser never sees them
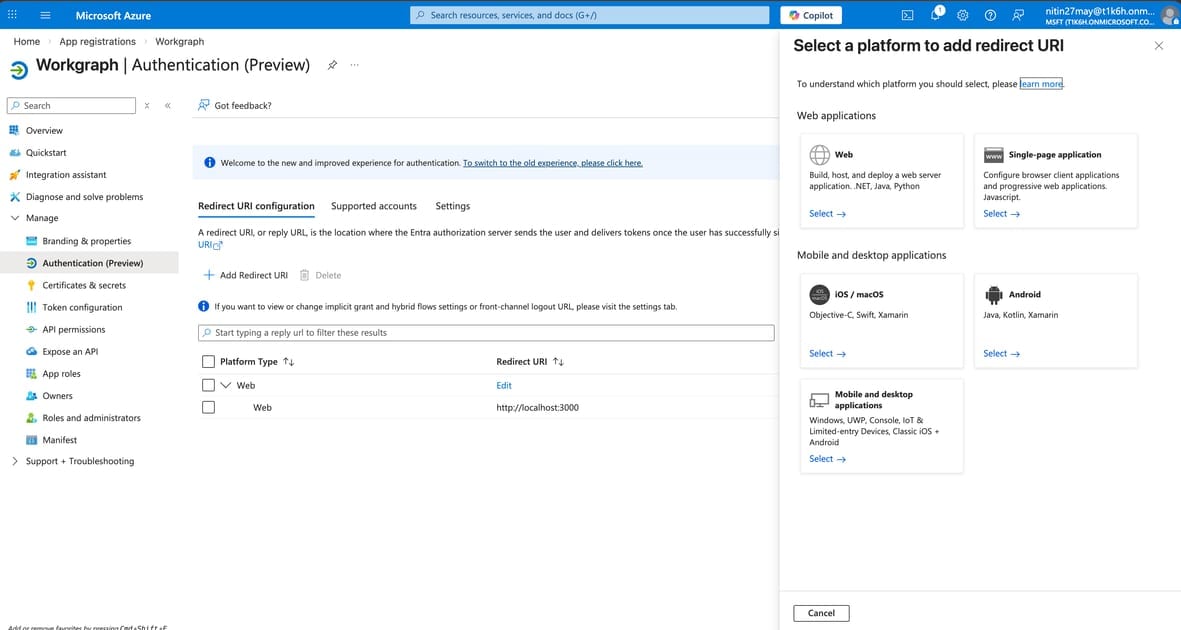
Platform to select in portal: Web
Requires secret or certificate: Yes. The server-side exchange needs to prove it is your app.
Redirect URI format: https://yourapp.com/auth/callback, which must be HTTPS in production; http://localhost:PORT/auth/callback is allowed for development.
Single Page Application (SPA, Public Client)
A browser-only frontend: React, Angular, or Vue with no server-side backend, or a backend-for-frontend pattern where the browser itself gets tokens.
Flow: Authorization Code flow with PKCE (Proof Key for Code Exchange). The implicit flow (response_type=token) was deprecated in 2019, so do not use it.
PKCE replaces the client secret with a cryptographically random challenge generated per-request in the browser. There is nothing to steal from JavaScript bundles.
Platform to select in portal: Single-page application
Requires secret or certificate: No. PKCE handles it.
Redirect URI format: https://yourapp.com or http://localhost:4200 for Angular CLI dev server.
Mobile and Desktop Applications (Public Client)
Native apps: MAUI, WPF, WinForms, Electron, iOS, Android.
Flow: Authorization Code with PKCE. On Windows you can also use Windows Integrated Authentication (Kerberos) for single sign-on in domain-joined environments.
Platform to select in portal: Mobile and desktop applications. Pick the pre-built redirect URIs for MSAL:
https://login.microsoftonline.com/common/oauth2/nativeclientmsal{client-id}://auth(for iOS/Android)
Requires secret or certificate: No.
Daemon / Background Service (Confidential Client)
No user interaction. A scheduled job, Azure Function, microservice, or any process that needs to call an API as itself rather than on behalf of a user.
Flow: Client Credentials flow. No authorization code, no user, just a direct token request using the client ID plus secret or certificate.
POST https://login.microsoftonline.com/{tenant-id}/oauth2/v2.0/tokenContent-Type: application/x-www-form-urlencoded
grant_type=client_credentials&client_id={client-id}&client_secret={client-secret}&scope=https://graph.microsoft.com/.default
The .default scope means “request all application permissions that have been admin-consented for this app.”
Platform to select in portal: None. Daemon apps do not need a platform or redirect URI configured.
Requires secret or certificate: Yes. This is the only authentication mechanism available.
Redirect URIs
A redirect URI is the endpoint Azure AD sends the authorization code (or tokens in legacy flows) to after authentication. Rules:
- Must exactly match what your app registers. One character difference and authentication fails with
AADSTS50011. - HTTPS required in production (localhost HTTP is allowed).
- You can register up to 256 redirect URIs per app.
- Wildcards are not allowed for web apps (they are allowed for mobile custom scheme URIs like
myapp://auth*).
Refer to the above example for the redirect URI, we have added one local app URI.
Common mistake: Registering https://yourapp.com/callback but your app sends https://yourapp.com/callback/ (trailing slash). They are different URIs. Azure AD treats them as a mismatch.
Front-channel logout URL
Also on the Authentication blade. When Azure AD signs a user out of all sessions (e.g., user changes their password), it sends a GET to this URL to let your app clear its own session. Set it if your app maintains server-side sessions.
Credentials: Client Secrets and Certificates
Found under Certificates & secrets on the app blade.
Client Secrets
A random string Azure generates (you cannot set your own). You copy it once when created, and it is never shown again.
Add a secret: Certificates & secrets → Client secrets → New client secret → enter a description → pick expiry (6 months, 12 months, 18 months, 24 months, or Custom up to 24 months, unless your tenant policy allows longer).
// .NET — configure MSAL with a client secretvar app = ConfidentialClientApplicationBuilder .Create(clientId) .WithTenantId(tenantId) .WithClientSecret(clientSecret) // from config, not hardcoded .Build();Expiry is enforced. When a secret expires, every app using it stops authenticating. Set a calendar reminder when you create a secret, and ideally automate rotation with Azure Key Vault references.
Never commit secrets to source control. Use environment variables, app settings, or Key Vault.
Certificates
A certificate is more secure than a secret for three reasons:
- The private key never leaves your infrastructure (you upload only the public key certificate to Azure AD).
- Stronger cryptography (RS256 or ES256 assertion signing).
- Better audit trail: you can see which certificate was used.
How to use a certificate:
-
Generate a self-signed certificate (or use one from your CA):
Terminal window openssl req -x509 -newkey rsa:2048 -keyout key.pem -out cert.pem -days 365 -nodes \-subj "/CN=MyAzureApp"openssl pkcs12 -export -out cert.pfx -inkey key.pem -in cert.pem -passout pass: -
Upload
cert.pem(the public key) to the Certificates tab in the portal. -
Store
cert.pfx(the private key) in Azure Key Vault or your server’s certificate store.
// .NET — configure MSAL with a certificate from Key Vaultvar credential = new DefaultAzureCredential();var secretClient = new SecretClient(new Uri(kvUri), credential);var certBytes = Convert.FromBase64String(    (await secretClient.GetSecretAsync("MyAppCert")).Value.Value);var cert = new X509Certificate2(certBytes);
var app = ConfidentialClientApplicationBuilder    .Create(clientId)    .WithTenantId(tenantId)    .WithCertificate(cert)    .Build();
Use certificates in production, secrets in development and CI pipelines. Managed Identity is even better where available: no credential to manage at all.
Federated Credentials (Workload Identity Federation)
A newer, better option for CI/CD and non-Azure workloads: your GitHub Actions workflow, Kubernetes pod, or Google Cloud workload presents a token from its own identity provider, and Azure AD trusts it without a secret or certificate.
If you are running pipelines in GitHub Actions, set up federated credentials instead of storing a client secret in GitHub Secrets.
Token Types
When your app authenticates, Azure AD returns tokens. Understanding what each one is for matters.
| Token | Audience | Lifetime | Purpose |
|---|---|---|---|
| ID token | Your app | ~1 hour | Proves who the user is. Contains user claims (name, email, object ID). |
| Access token | The API being called | ~1 hour | Proves the app is authorized to call an API. Contains scopes/roles. |
| Refresh token | Azure AD | 24h–90 days | Exchange for new access/ID tokens without user interaction. Only issued for delegated flows. |
Your app should never validate or parse the access token if you are the client calling an API (e.g., calling Microsoft Graph). The access token is for Graph, not for you. The ID token is what your app uses to know who signed in.
If you are building an API that receives access tokens, you must validate them (signature, issuer, audience, expiry). MSAL and the ASP.NET Core middleware do this for you.
Expose an API
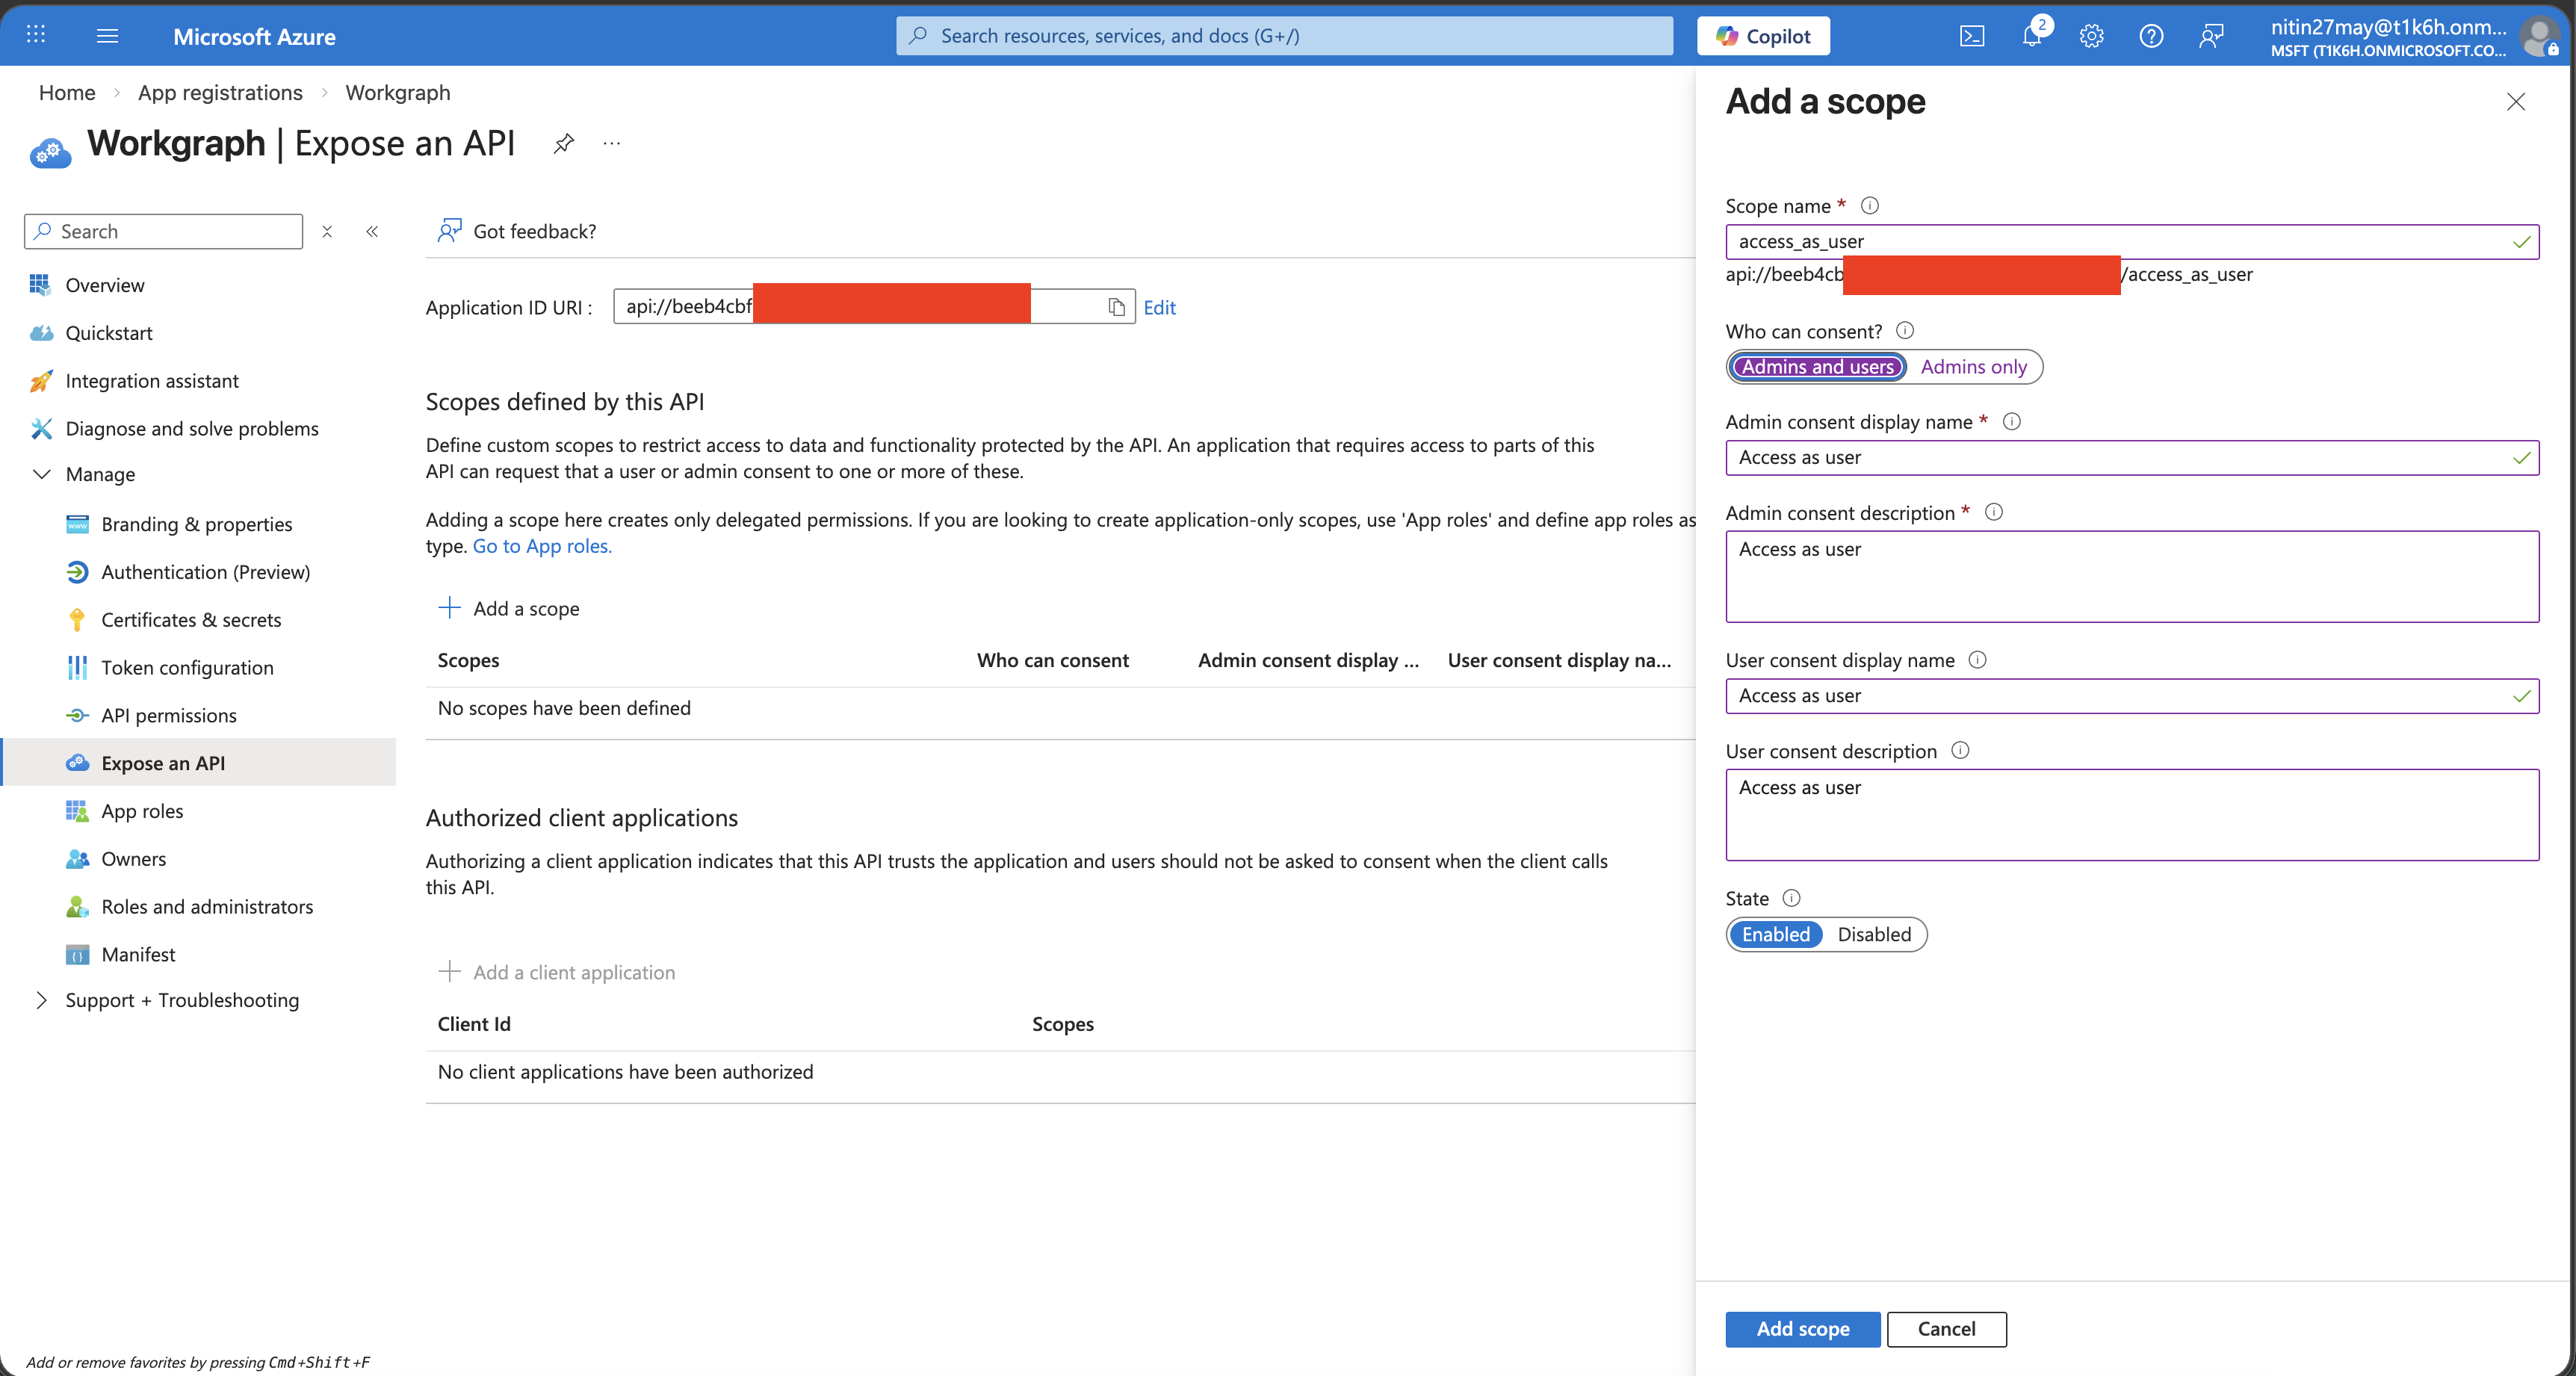
If your application is an API that other apps call (rather than only a client that calls other APIs), you need to define scopes under Expose an API.
Application ID URI
A unique identifier for your API in the format api://{client-id}. You can change it to something readable like api://mycompanyapi, but the default is fine. Set it by clicking the “Set” link at the top of the Expose an API blade.
Defining Scopes
A scope represents a permission that client applications can request to access your API.
Click Add a scope and fill in:
| Field | Example | Notes |
|---|---|---|
| Scope name | access_as_user | No spaces. Convention: lowercase with underscores. |
| Who can consent | Admins and users | Choose “Admins only” for sensitive operations. |
| Admin consent display name | Access MyAPI as a user | Shown to admins on the consent screen. |
| Admin consent description | Allows the app to call MyAPI on behalf of the signed-in user. | Be specific. |
| User consent display name | Access MyAPI | Shown to users on the consent screen. |
Client apps then request this scope as api://{client-id}/access_as_user.
Authorized Client Applications
You can pre-authorize specific client apps to use your API scopes without requiring user consent. This is useful for first-party clients that you own. Add their client ID and the scope.
Branding and Properties
Under Branding & properties:
- Publisher domain: shown on consent screens. Verify your domain to replace the default
*.onmicrosoft.comdisplay with your own domain, which makes consent screens less alarming to users. - Logo: displayed on the consent screen and in myapps.microsoft.com.
- Service terms / Privacy statement URLs: required if your app requests user consent at runtime.
The Manifest
The Manifest blade shows the raw JSON of the application object. Almost everything configurable in the portal blades is represented here. Occasionally you need to edit the manifest directly for properties that the portal does not expose:
"accessTokenAcceptedVersion": 2: force v2 tokens (default for new apps, but older registrations may be v1)."optionalClaims": add extra claims to tokens (e.g.,upn,auth_time,email)."groupMembershipClaims": "SecurityGroup": include group IDs in tokens for RBAC."requiredResourceAccess": programmatically define API permissions (useful for IaC).
Multi-Tenant Applications
If you chose “Accounts in any organizational directory,” the sign-in endpoint changes. Use common or organizations instead of your tenant ID:
https://login.microsoftonline.com/common/oauth2/v2.0/authorizeFirst-time sign-in from a new tenant triggers a consent prompt. The user (or admin) consents, and Azure AD creates a service principal in their tenant. After that, tokens work normally.
Admin consent URL for multi-tenant apps:
https://login.microsoftonline.com/{customer-tenant-id}/adminconsent?client_id={your-client-id}&redirect_uri={your-redirect-uri}Send this URL to IT admins at customer organizations so they can grant consent org-wide without individual users being prompted.
Quick Reference: What Goes Where
| Thing | Where to configure it |
|---|---|
| Redirect URIs | Authentication → platform section |
| Logout URL | Authentication → Front-channel logout URL |
| Client secrets | Certificates & secrets → Client secrets |
| Certificate (public key) | Certificates & secrets → Certificates |
| Federated credentials | Certificates & secrets → Federated credentials |
| API permissions your app needs | API permissions |
| Scopes your API exposes | Expose an API |
| App roles (RBAC for your app) | App roles |
| Optional claims in tokens | Token configuration or Manifest |
| Branding on consent screen | Branding & properties |
| Raw JSON config | Manifest |
Resources
- Microsoft Entra ID documentation1
- Microsoft identity platform: app types and flows2
- MSAL.NET documentation3
- OAuth 2.0 Authorization Code flow4
- Workload Identity Federation5
References
-
Microsoft Entra ID documentation — learn.microsoft.com ↩
-
Microsoft identity platform: app types and flows — learn.microsoft.com ↩
-
MSAL.NET documentation — learn.microsoft.com ↩
-
OAuth 2.0 Authorization Code flow — learn.microsoft.com ↩
-
Workload Identity Federation — learn.microsoft.com ↩
Comments
Comments are GitHub discussions. Sign in with GitHub to post; reactions need no account.